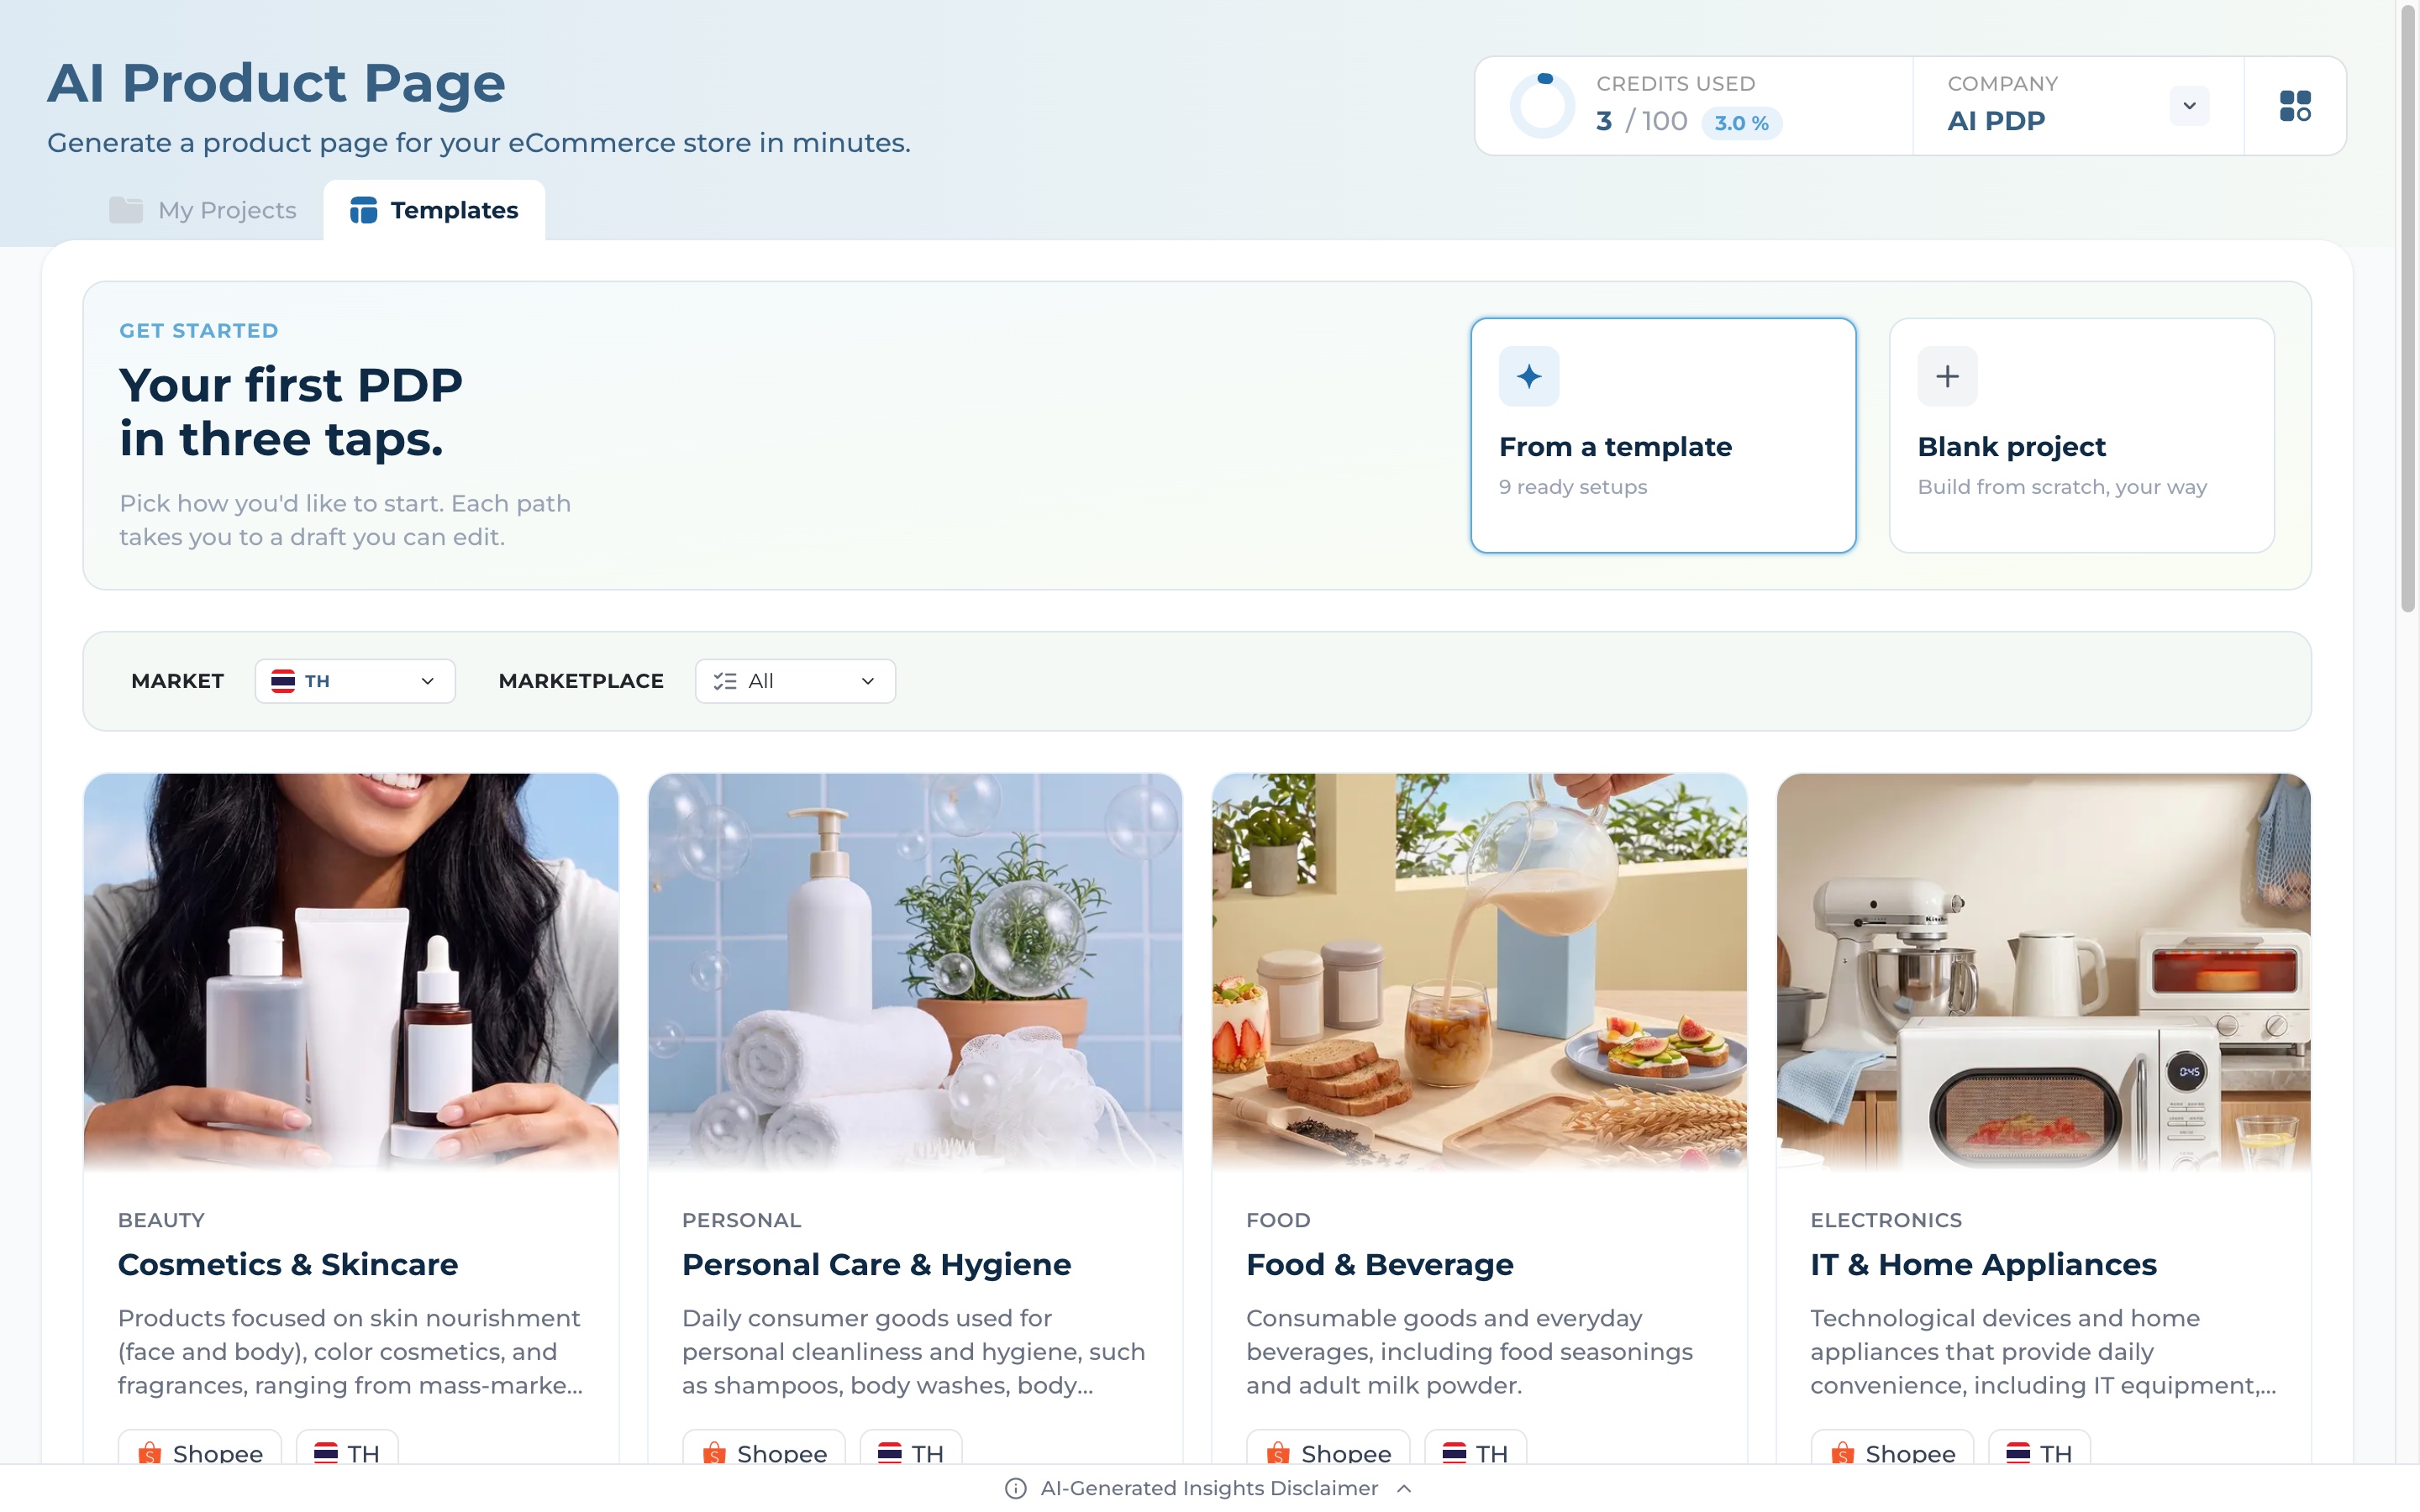
Pick an industry template or build from scratch — three taps to a draft
Step 1
Open AI Product Page
Land on Templates — 9 industry presets covering beauty, food, electronics, fashion, baby care, healthcare, pet, home care, and apparel
Filter by MARKET (6 SEA countries) and MARKETPLACE (Shopee, Lazada, TikTok, Website) to narrow the catalogue
Two entry points at the top: "From a template" (recommended) or "Blank project" if you want full control
Step 2
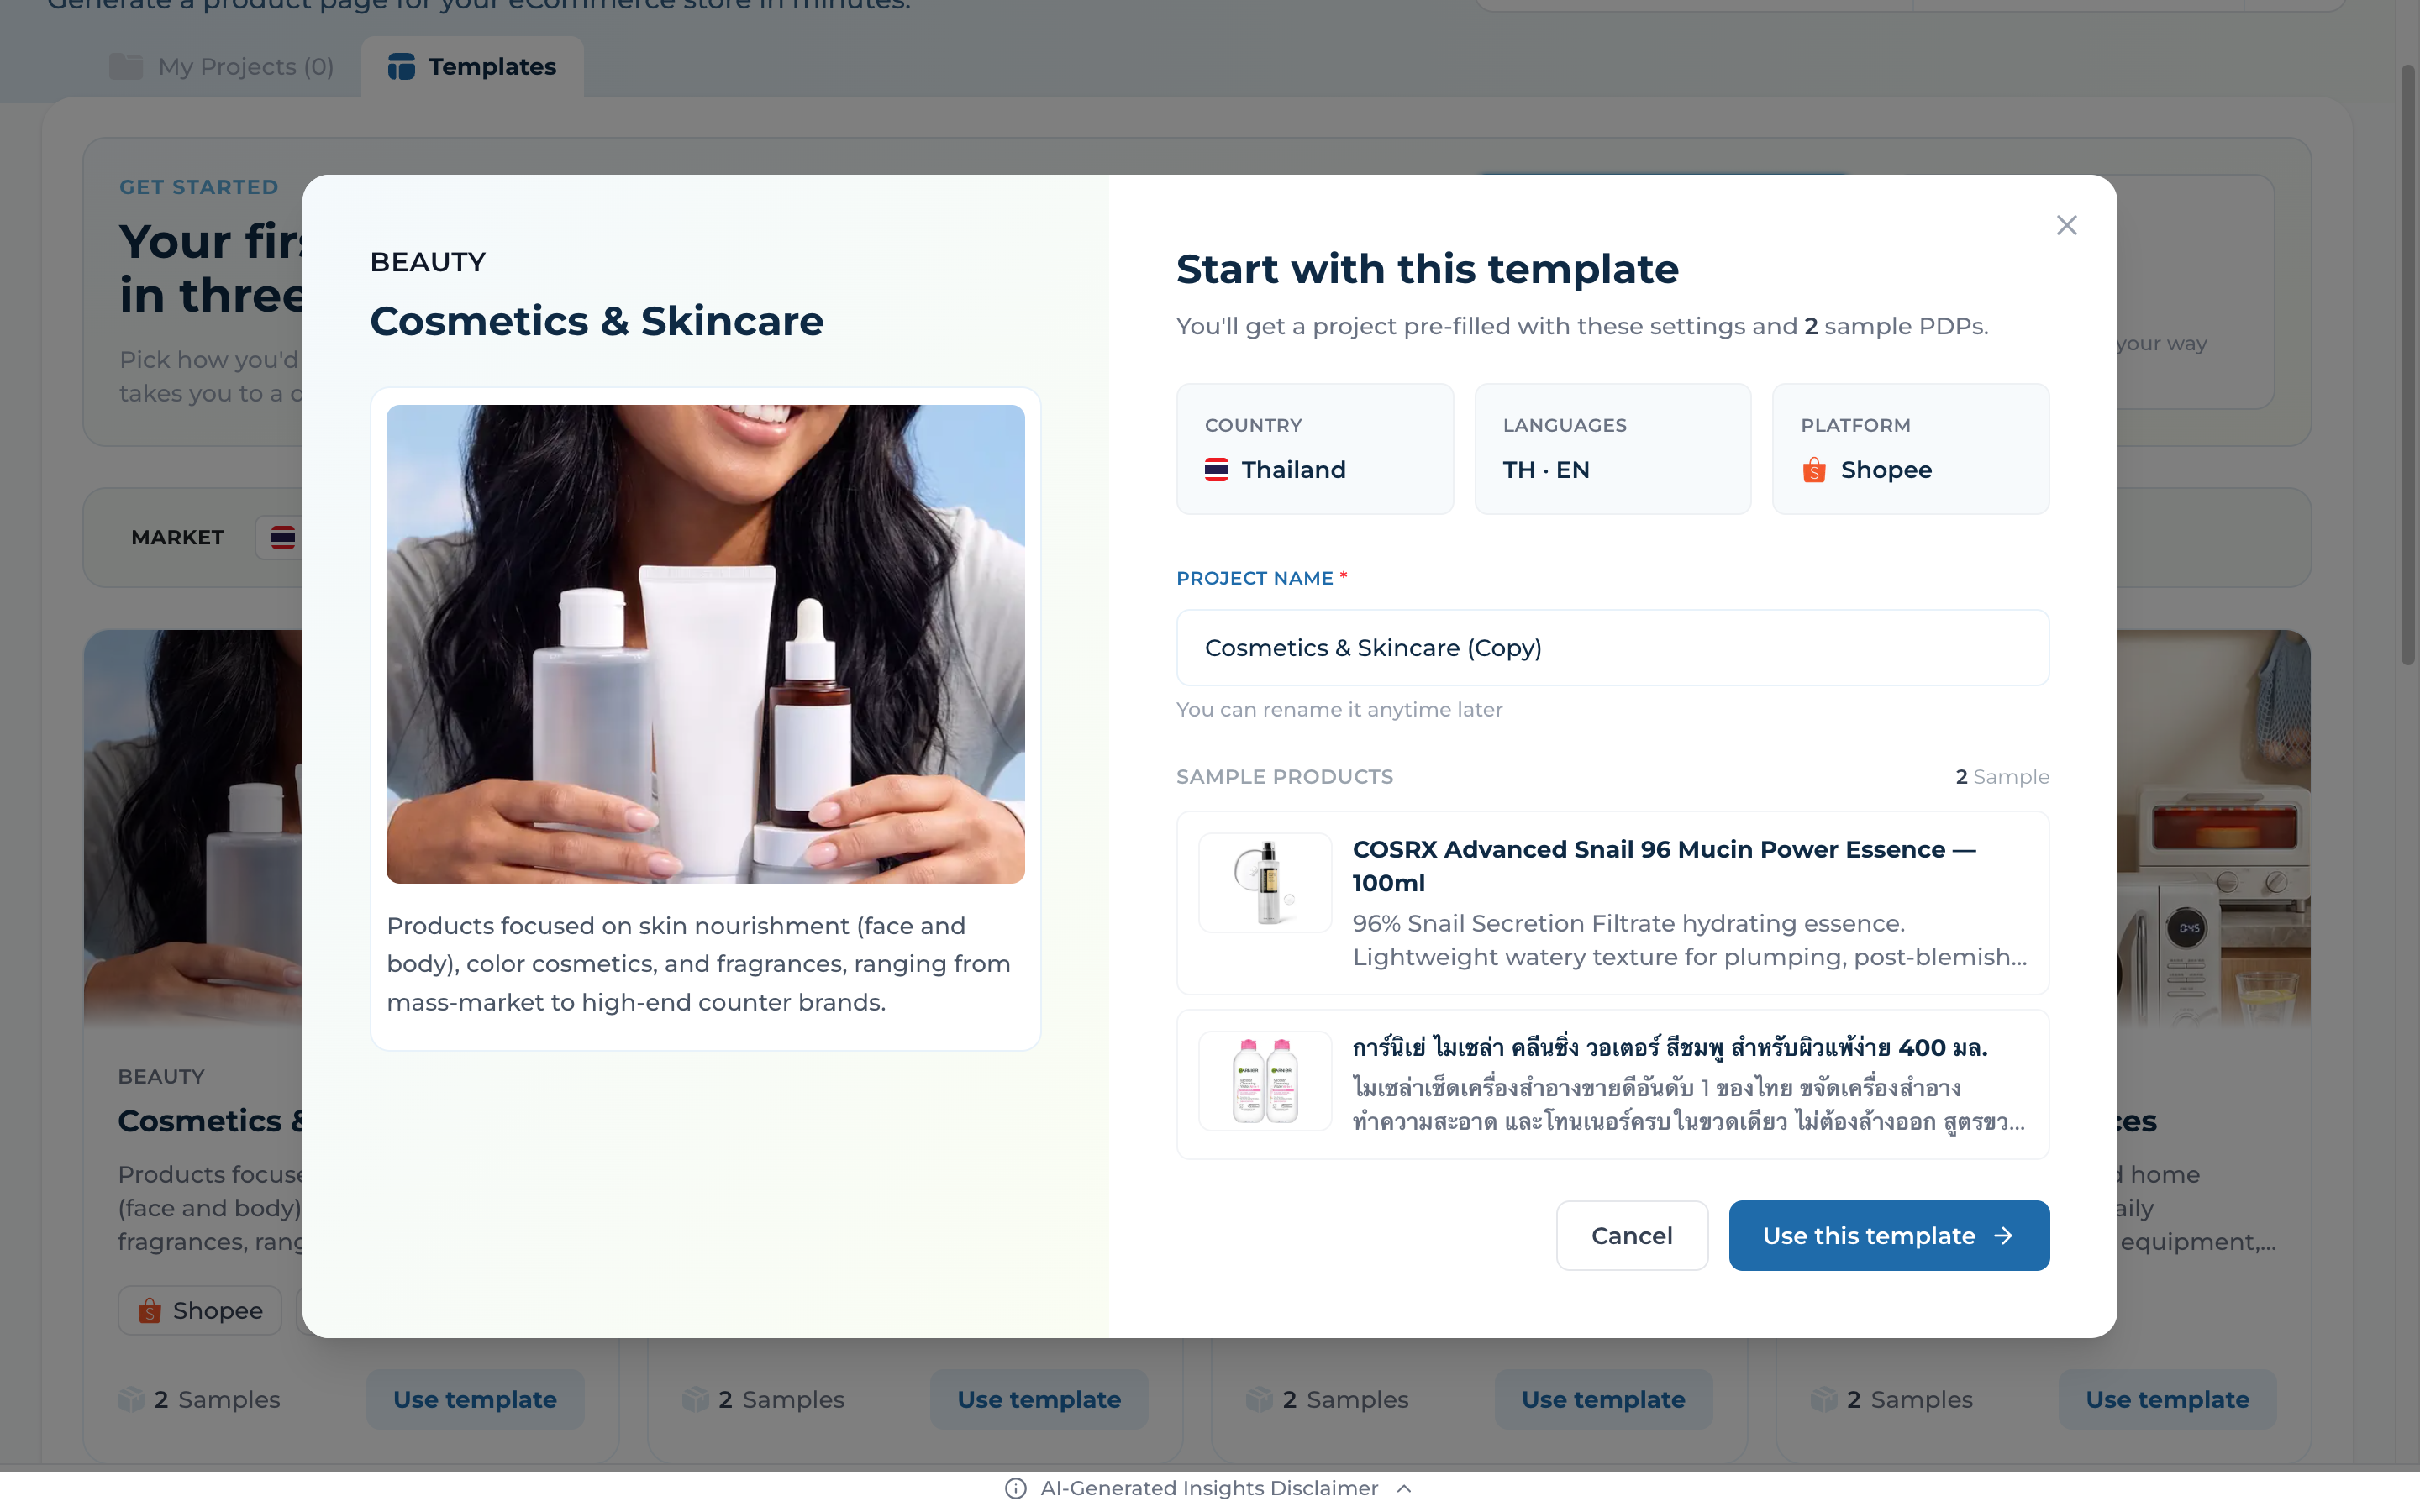
Pick a Template
Click any template card to open the detail dialog — preview country, languages, platform, and sample products
Rename your project in the "PROJECT NAME" field (defaults to "<Template> (Copy)") — you can rename anytime later
Click "Use this template" to spin up a project pre-loaded with 2 sample PDPs ready for generation
Step 3
Or Start From Blank
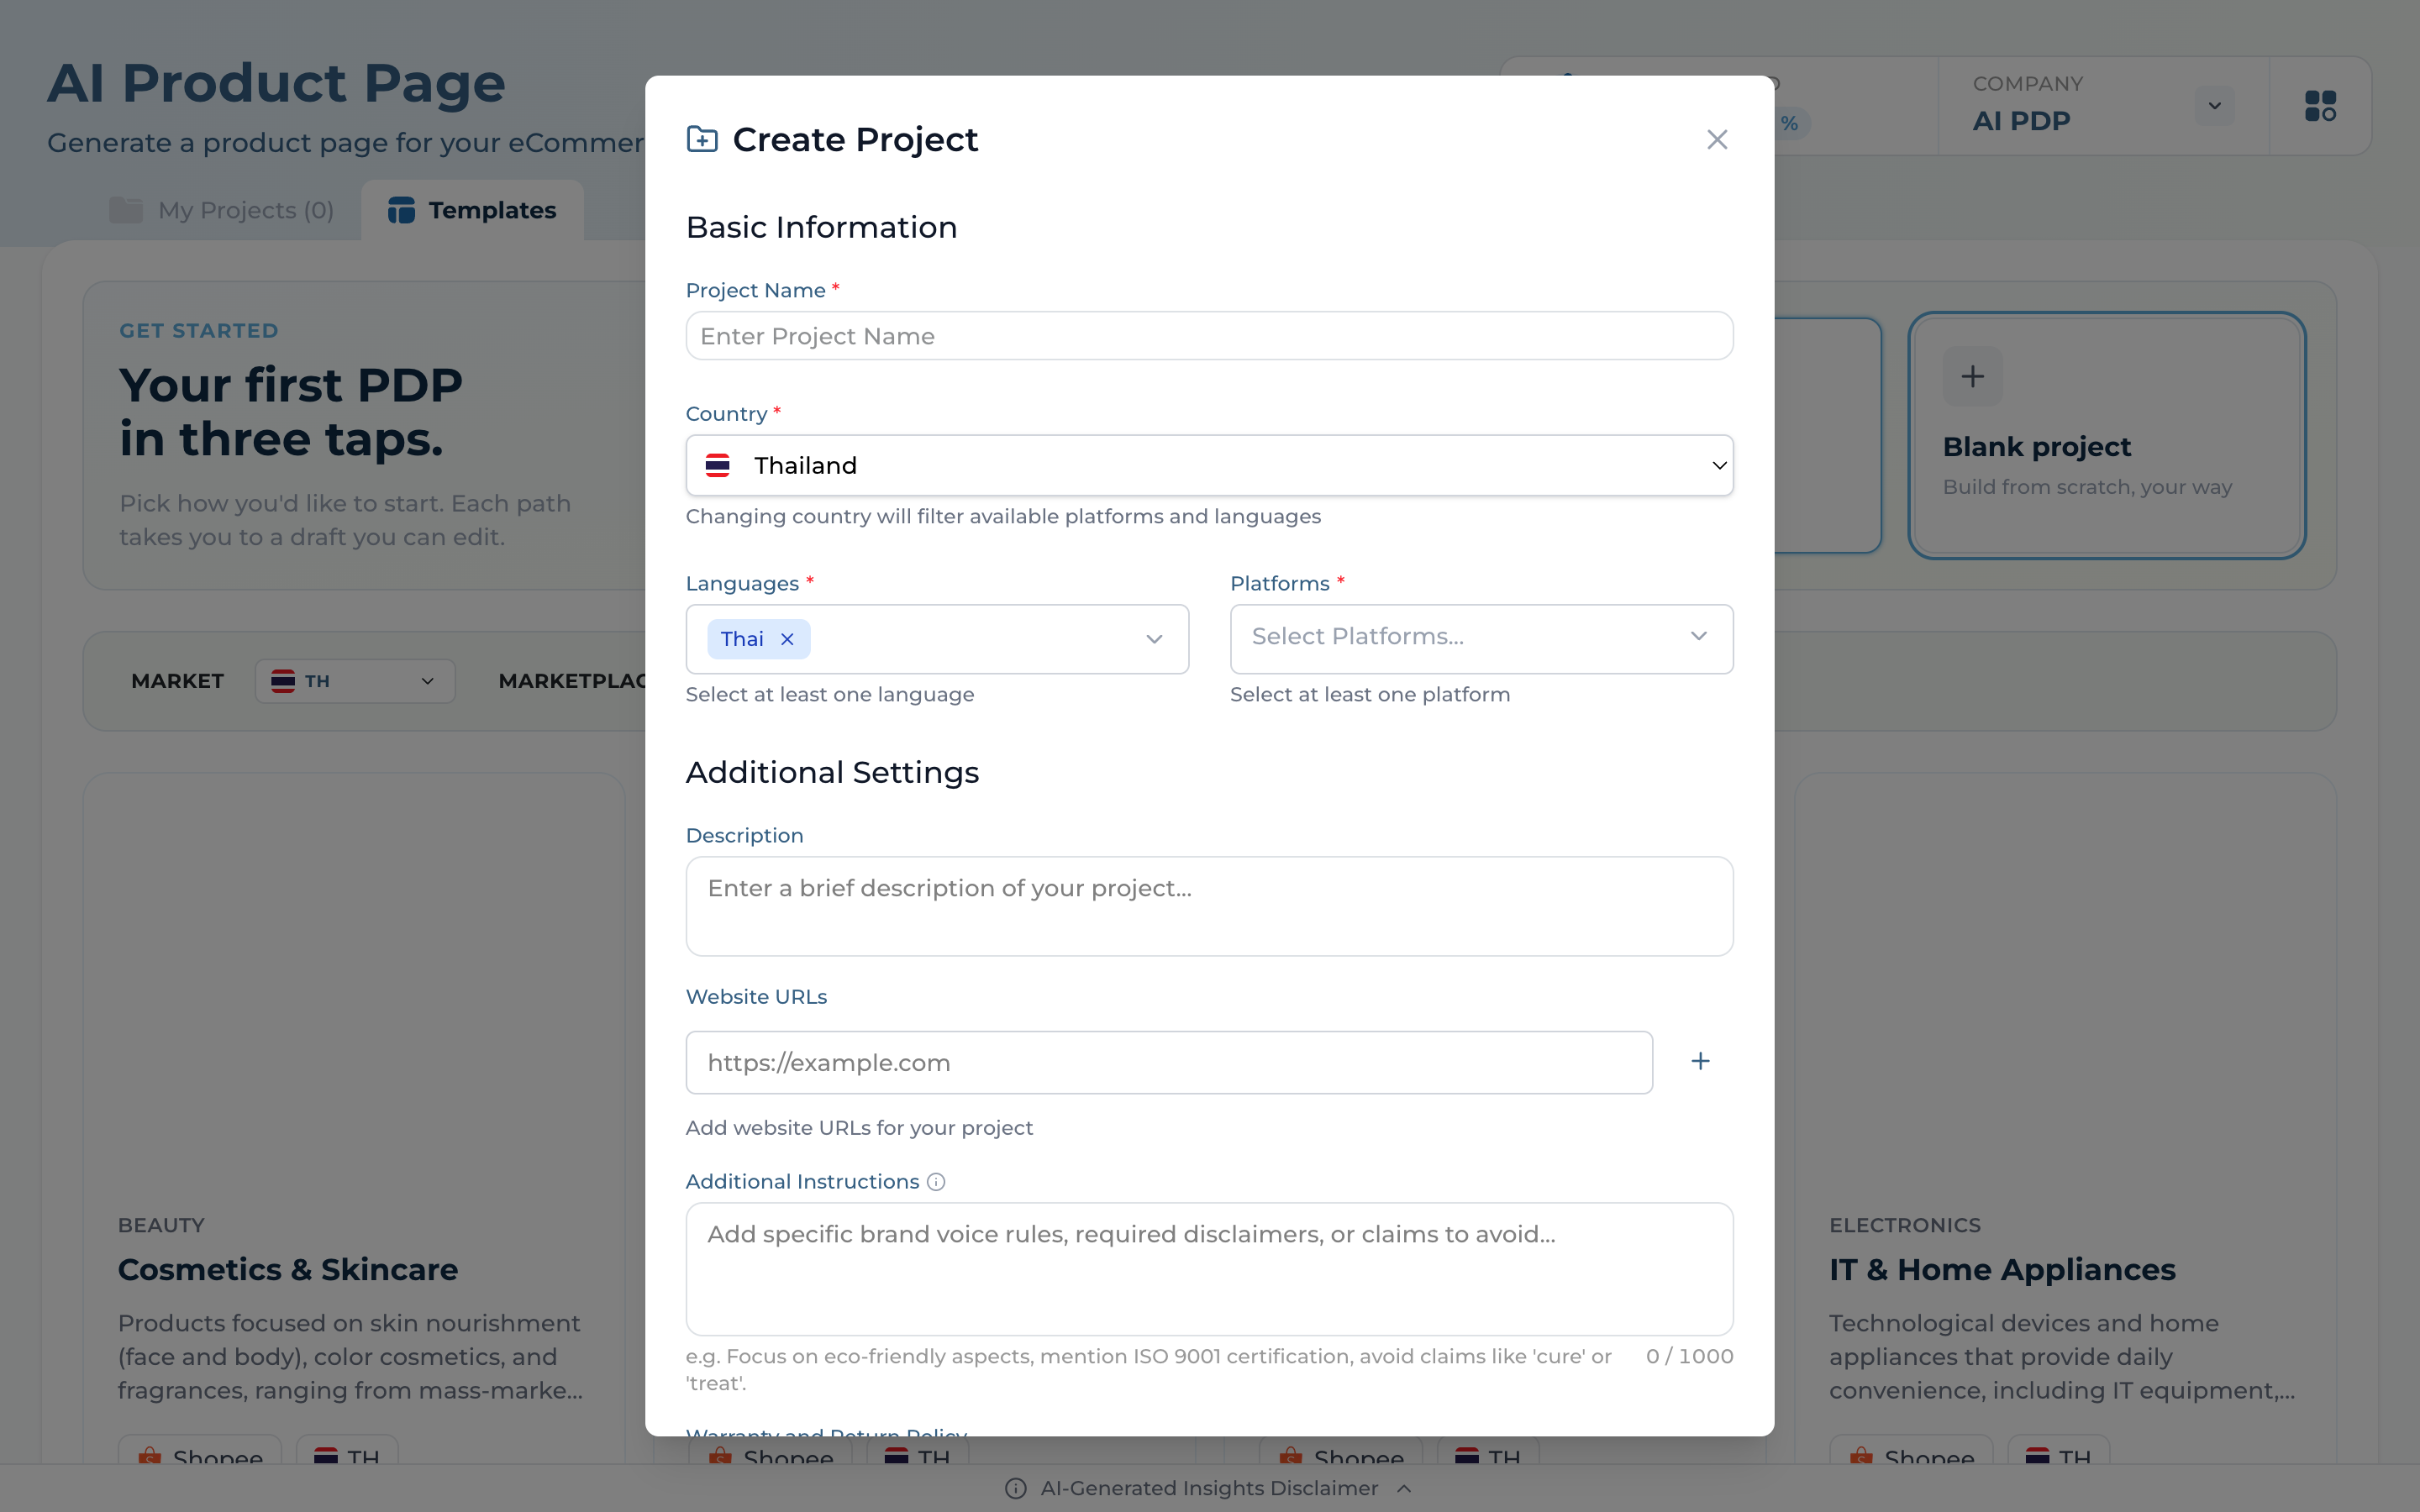
Click "Blank project" — the Create Project dialog opens with two sections: Basic Information and Additional Settings
Required: Project Name, Country (ID/MY/PH/SG/TH/VN — picks which platforms and languages are available), Languages (chip picker), and at least one Platform
Optional: Description, Website URLs, Additional Instructions (tone, claims to avoid — up to 5,000 chars), and Warranty & Return Policy — every product in the project inherits these
02
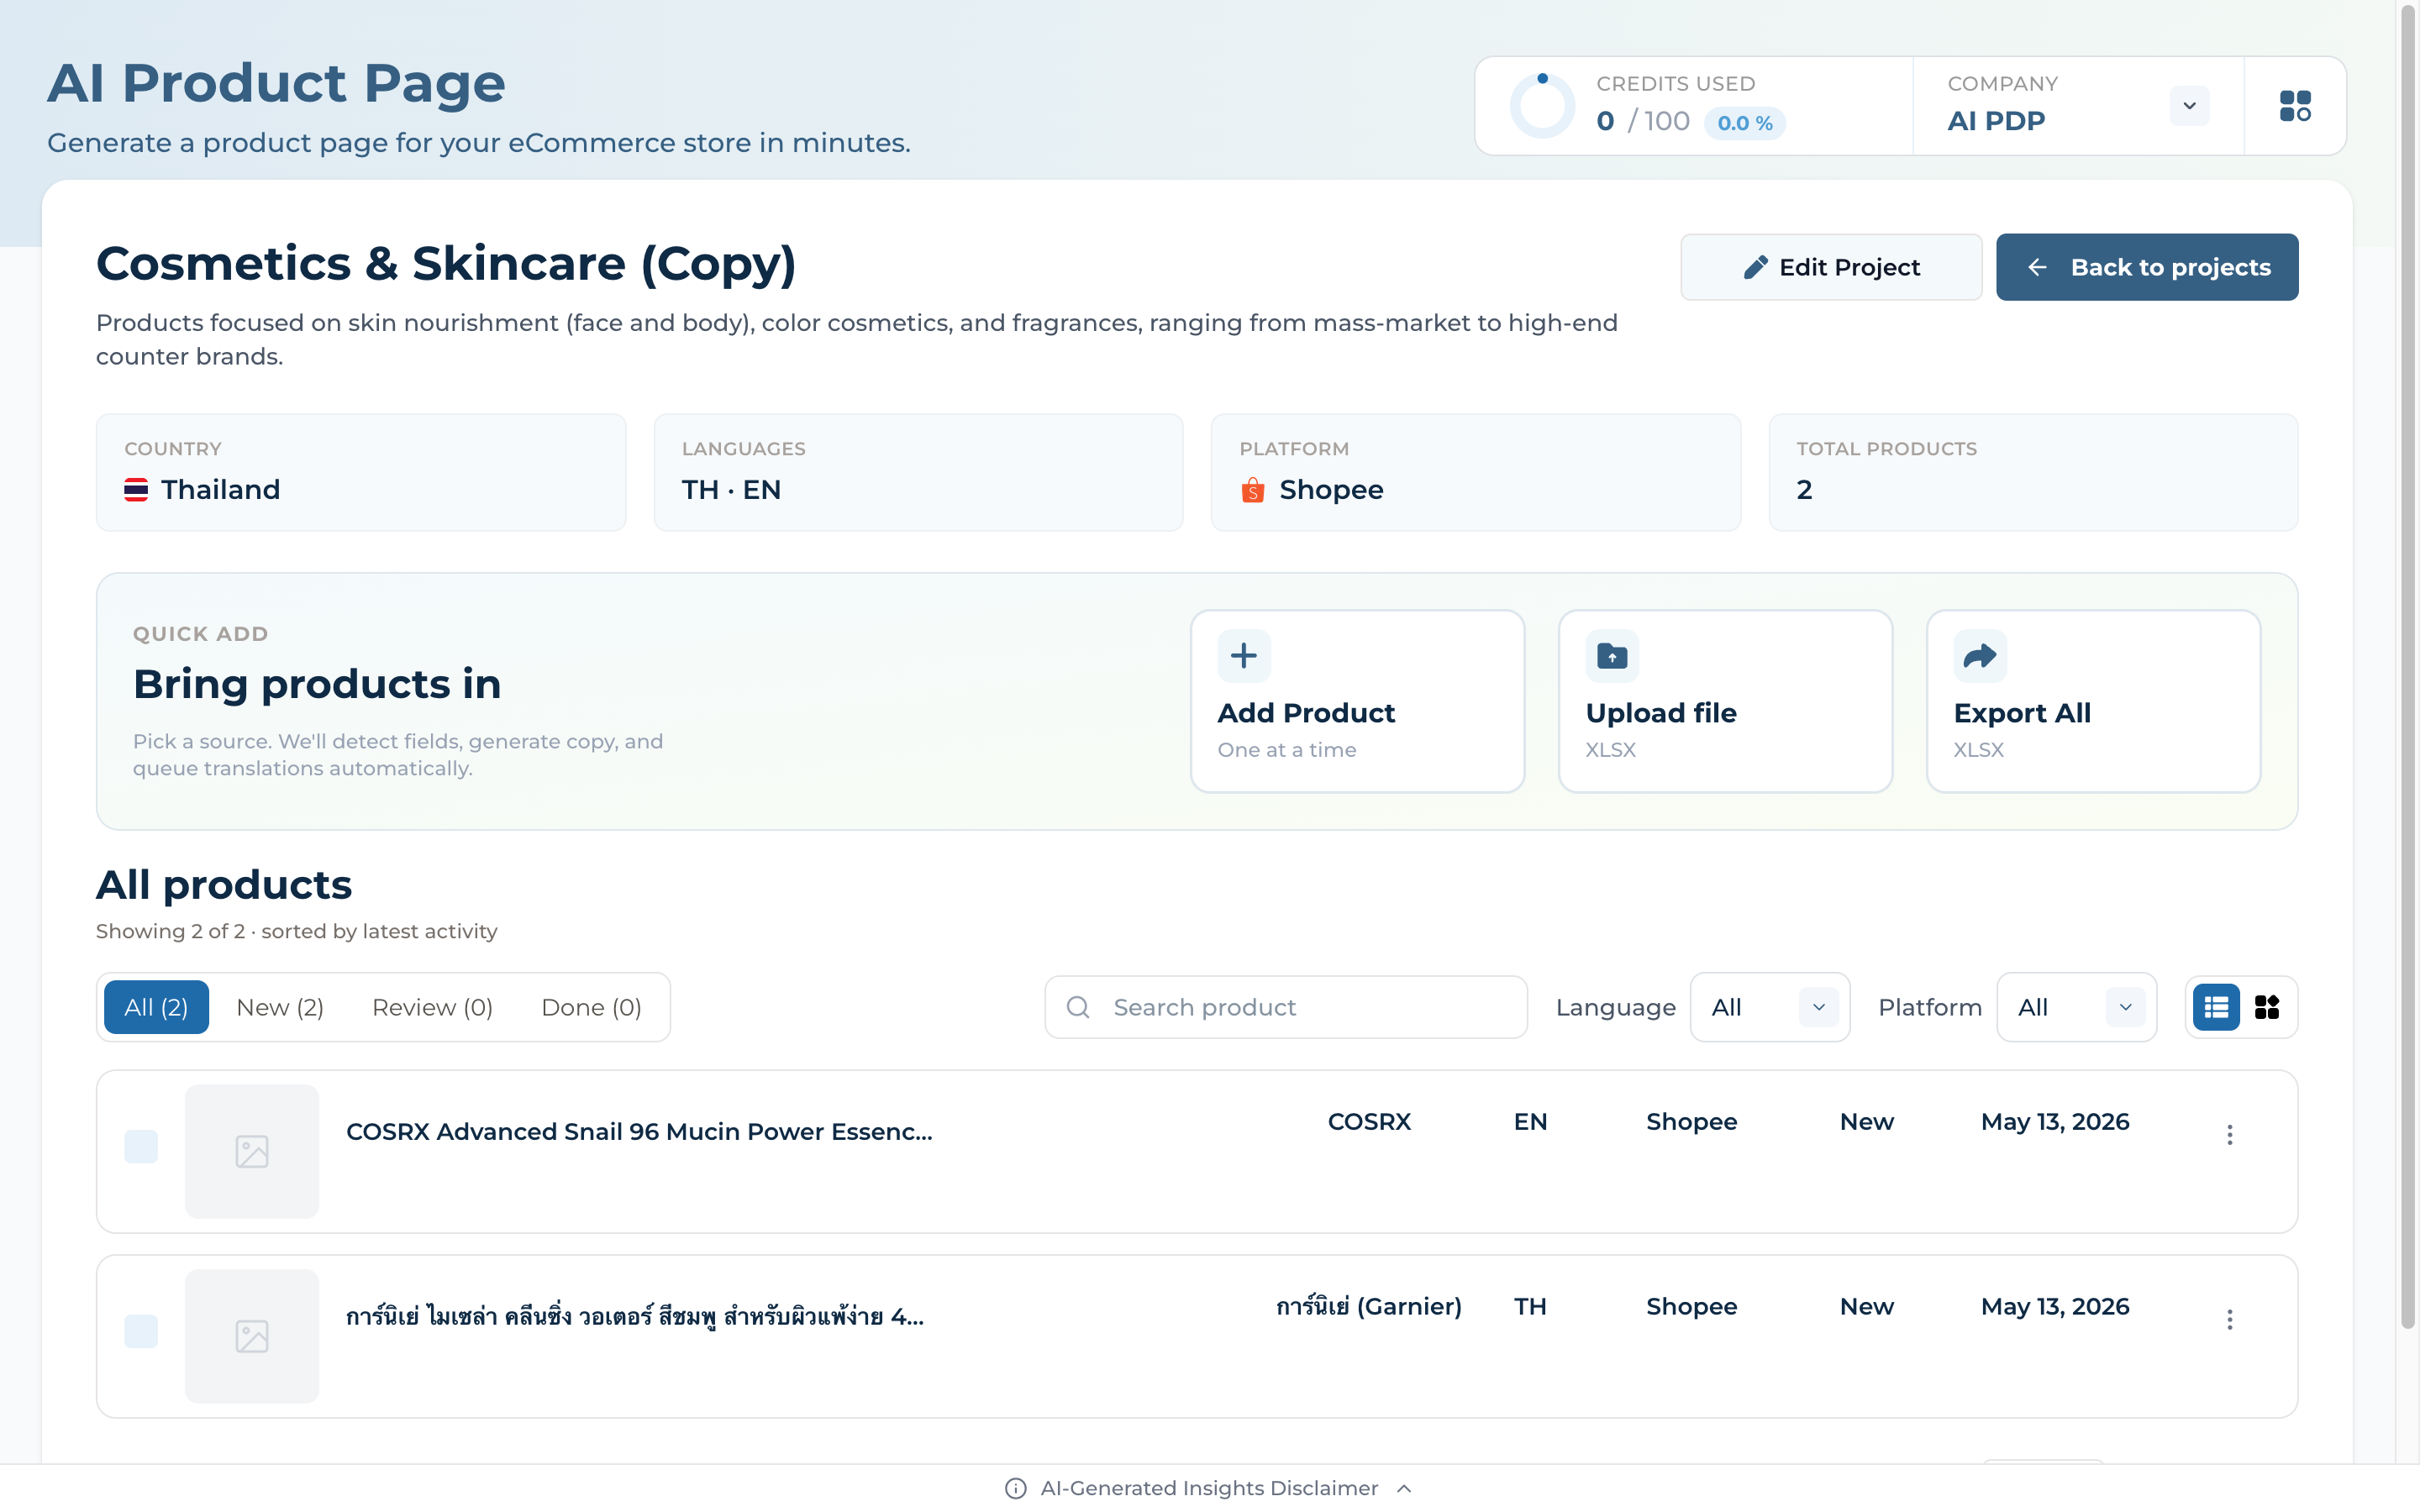
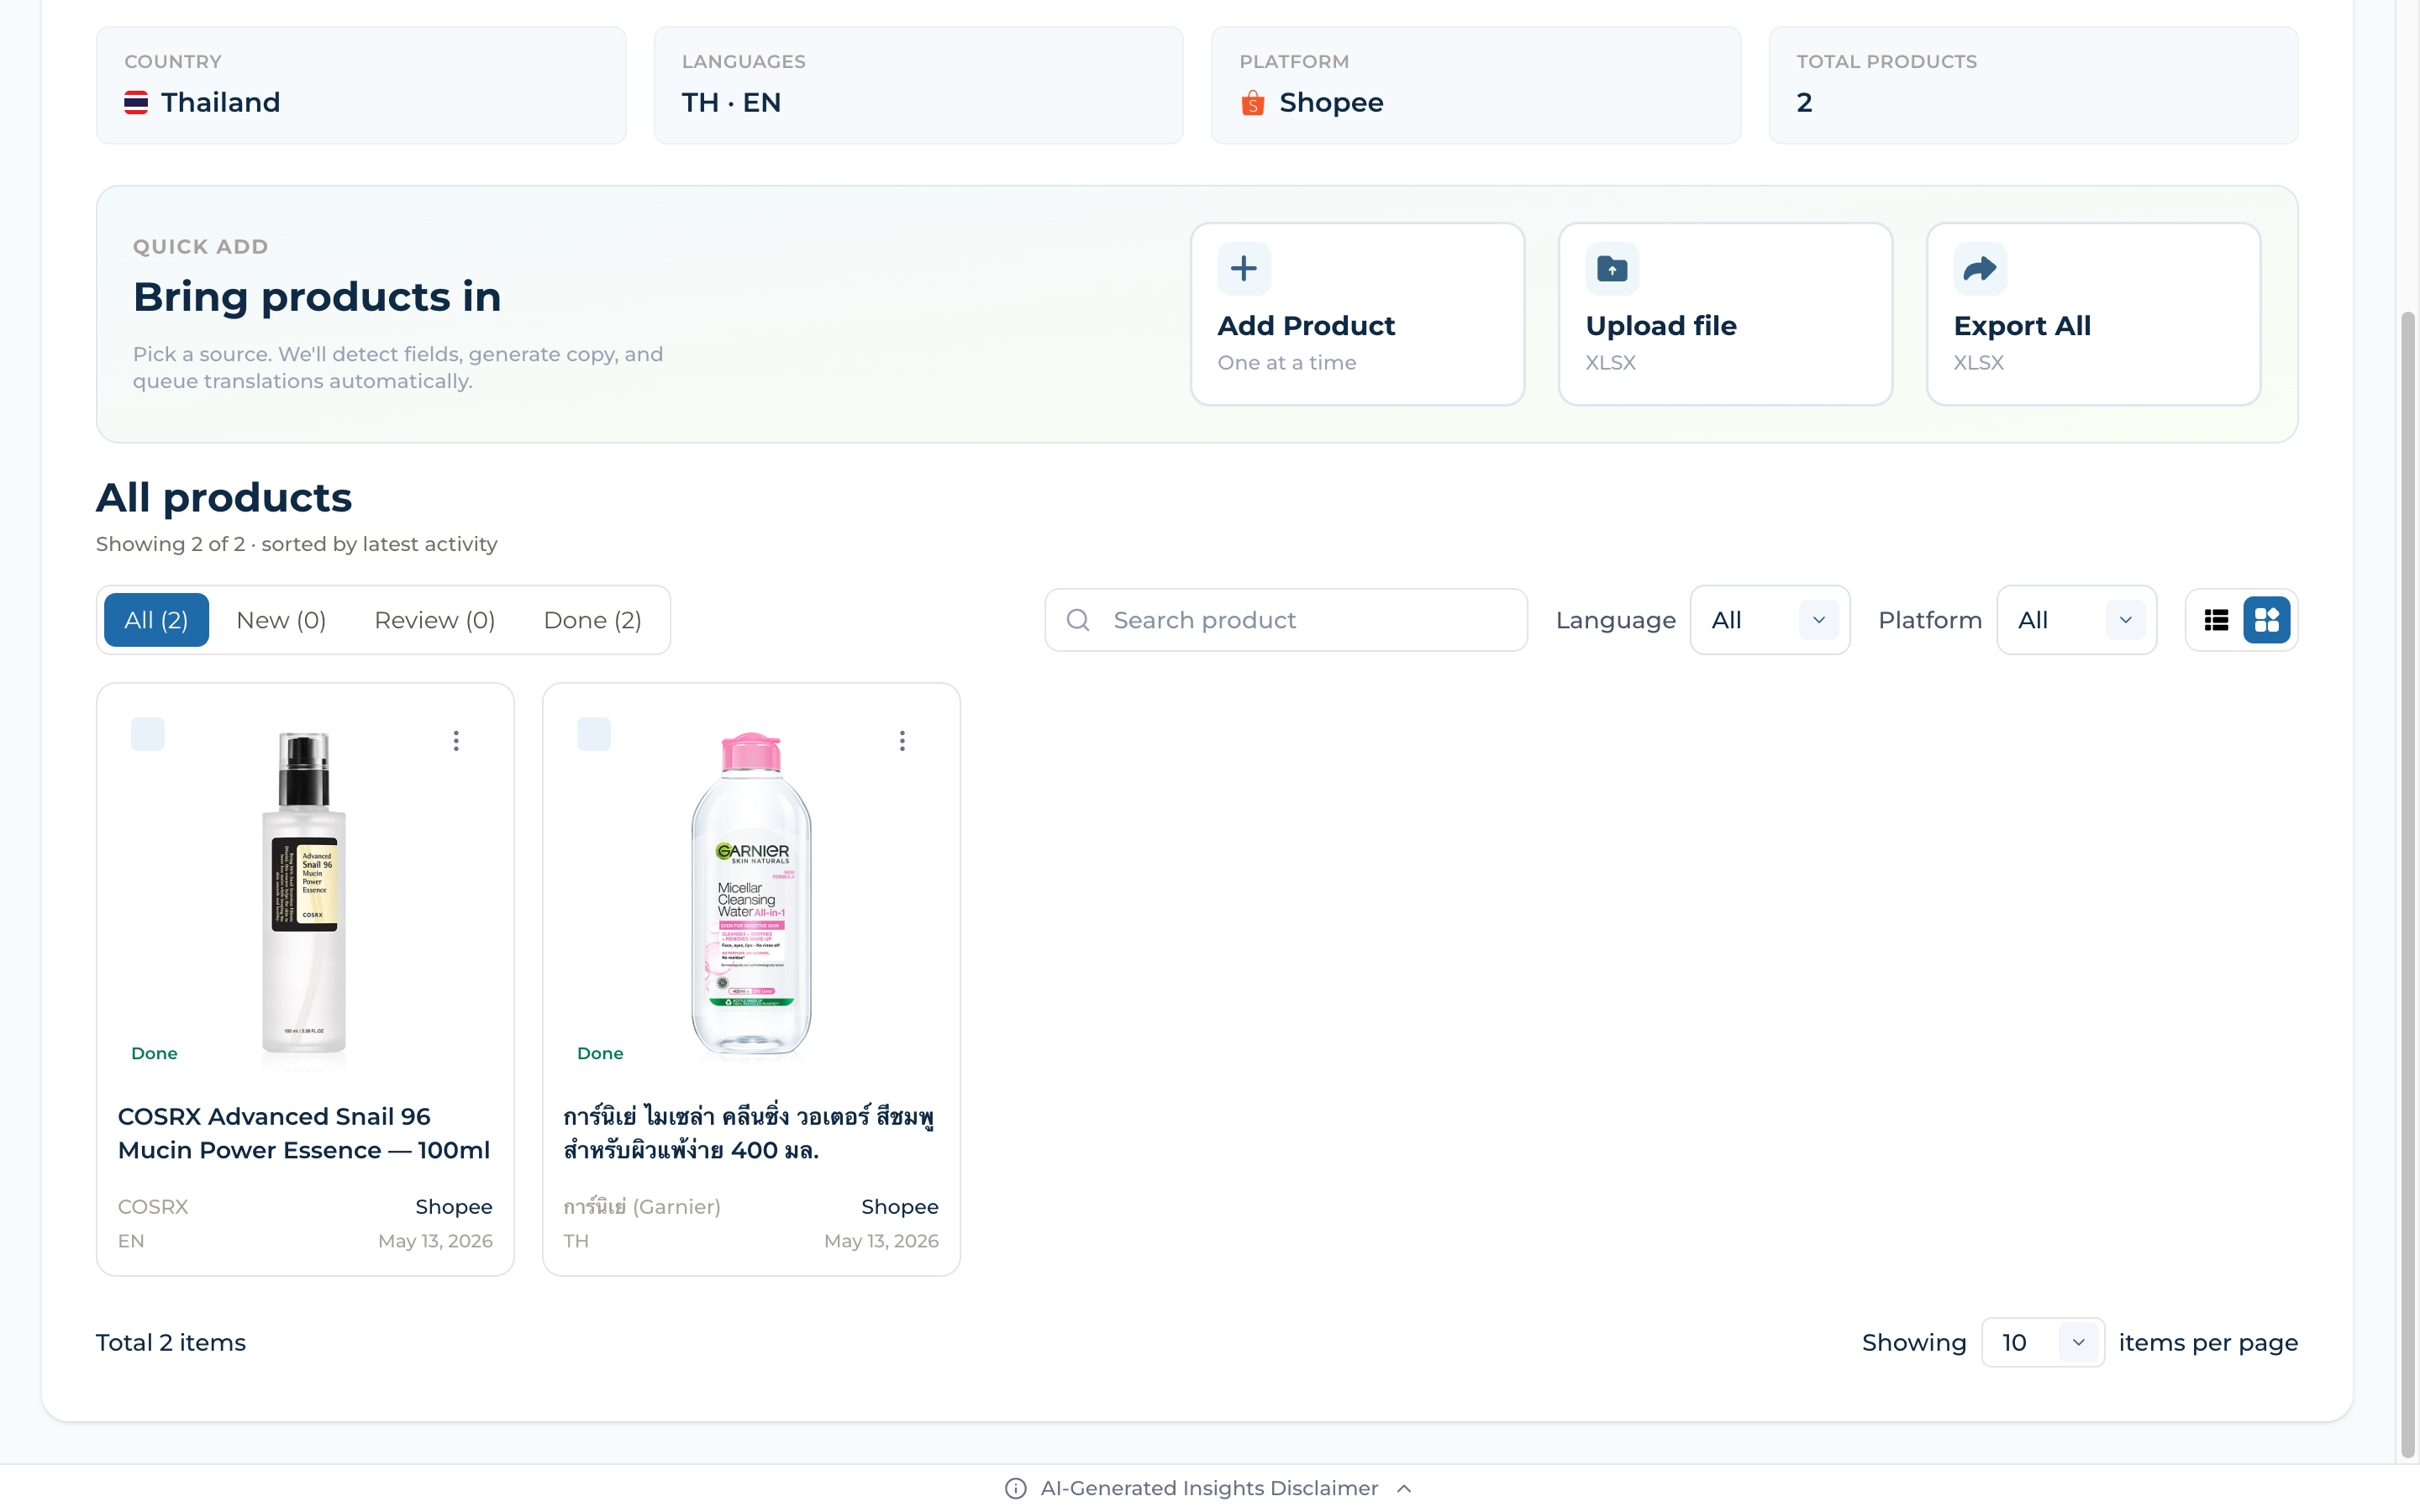
Project Dashboard
Your single pane of glass for every product in this project
Step 4
Your Project Workspace
Top right always shows the Credits / Company card — credits used vs total, plus the active organization (switch with the chevron)
Project header lists country, languages, platform, total products — use the pencil for a quick rename, or Edit Project for the full settings dialog
"Bring products in" gives three on-ramps — Add Product (one at a time), Upload file XLSX (bulk), or Export All XLSX — and the list below filters by status tabs (All / New / Review / Done), Language, Platform, plus list/grid toggle
03
Add Products
Open a product to give the AI everything it needs to write a great page
Step 5
Add a Product
Click "Add Product" (One at a time) — the Add New Product dialog opens with three quick fields: "Give it a name and pick a marketplace — we'll handle the rest"
Type the raw Product Name, confirm Marketplace and Language (pre-filled from project settings) — that's all you need to start a draft
Click Add Product — you land on the Product Detail Page, where the rest of the workflow happens. Or click any row in the list to reopen an existing product instead
04
Configure AI Generation
Tune the inputs that shape every word of your PDP
Step 6
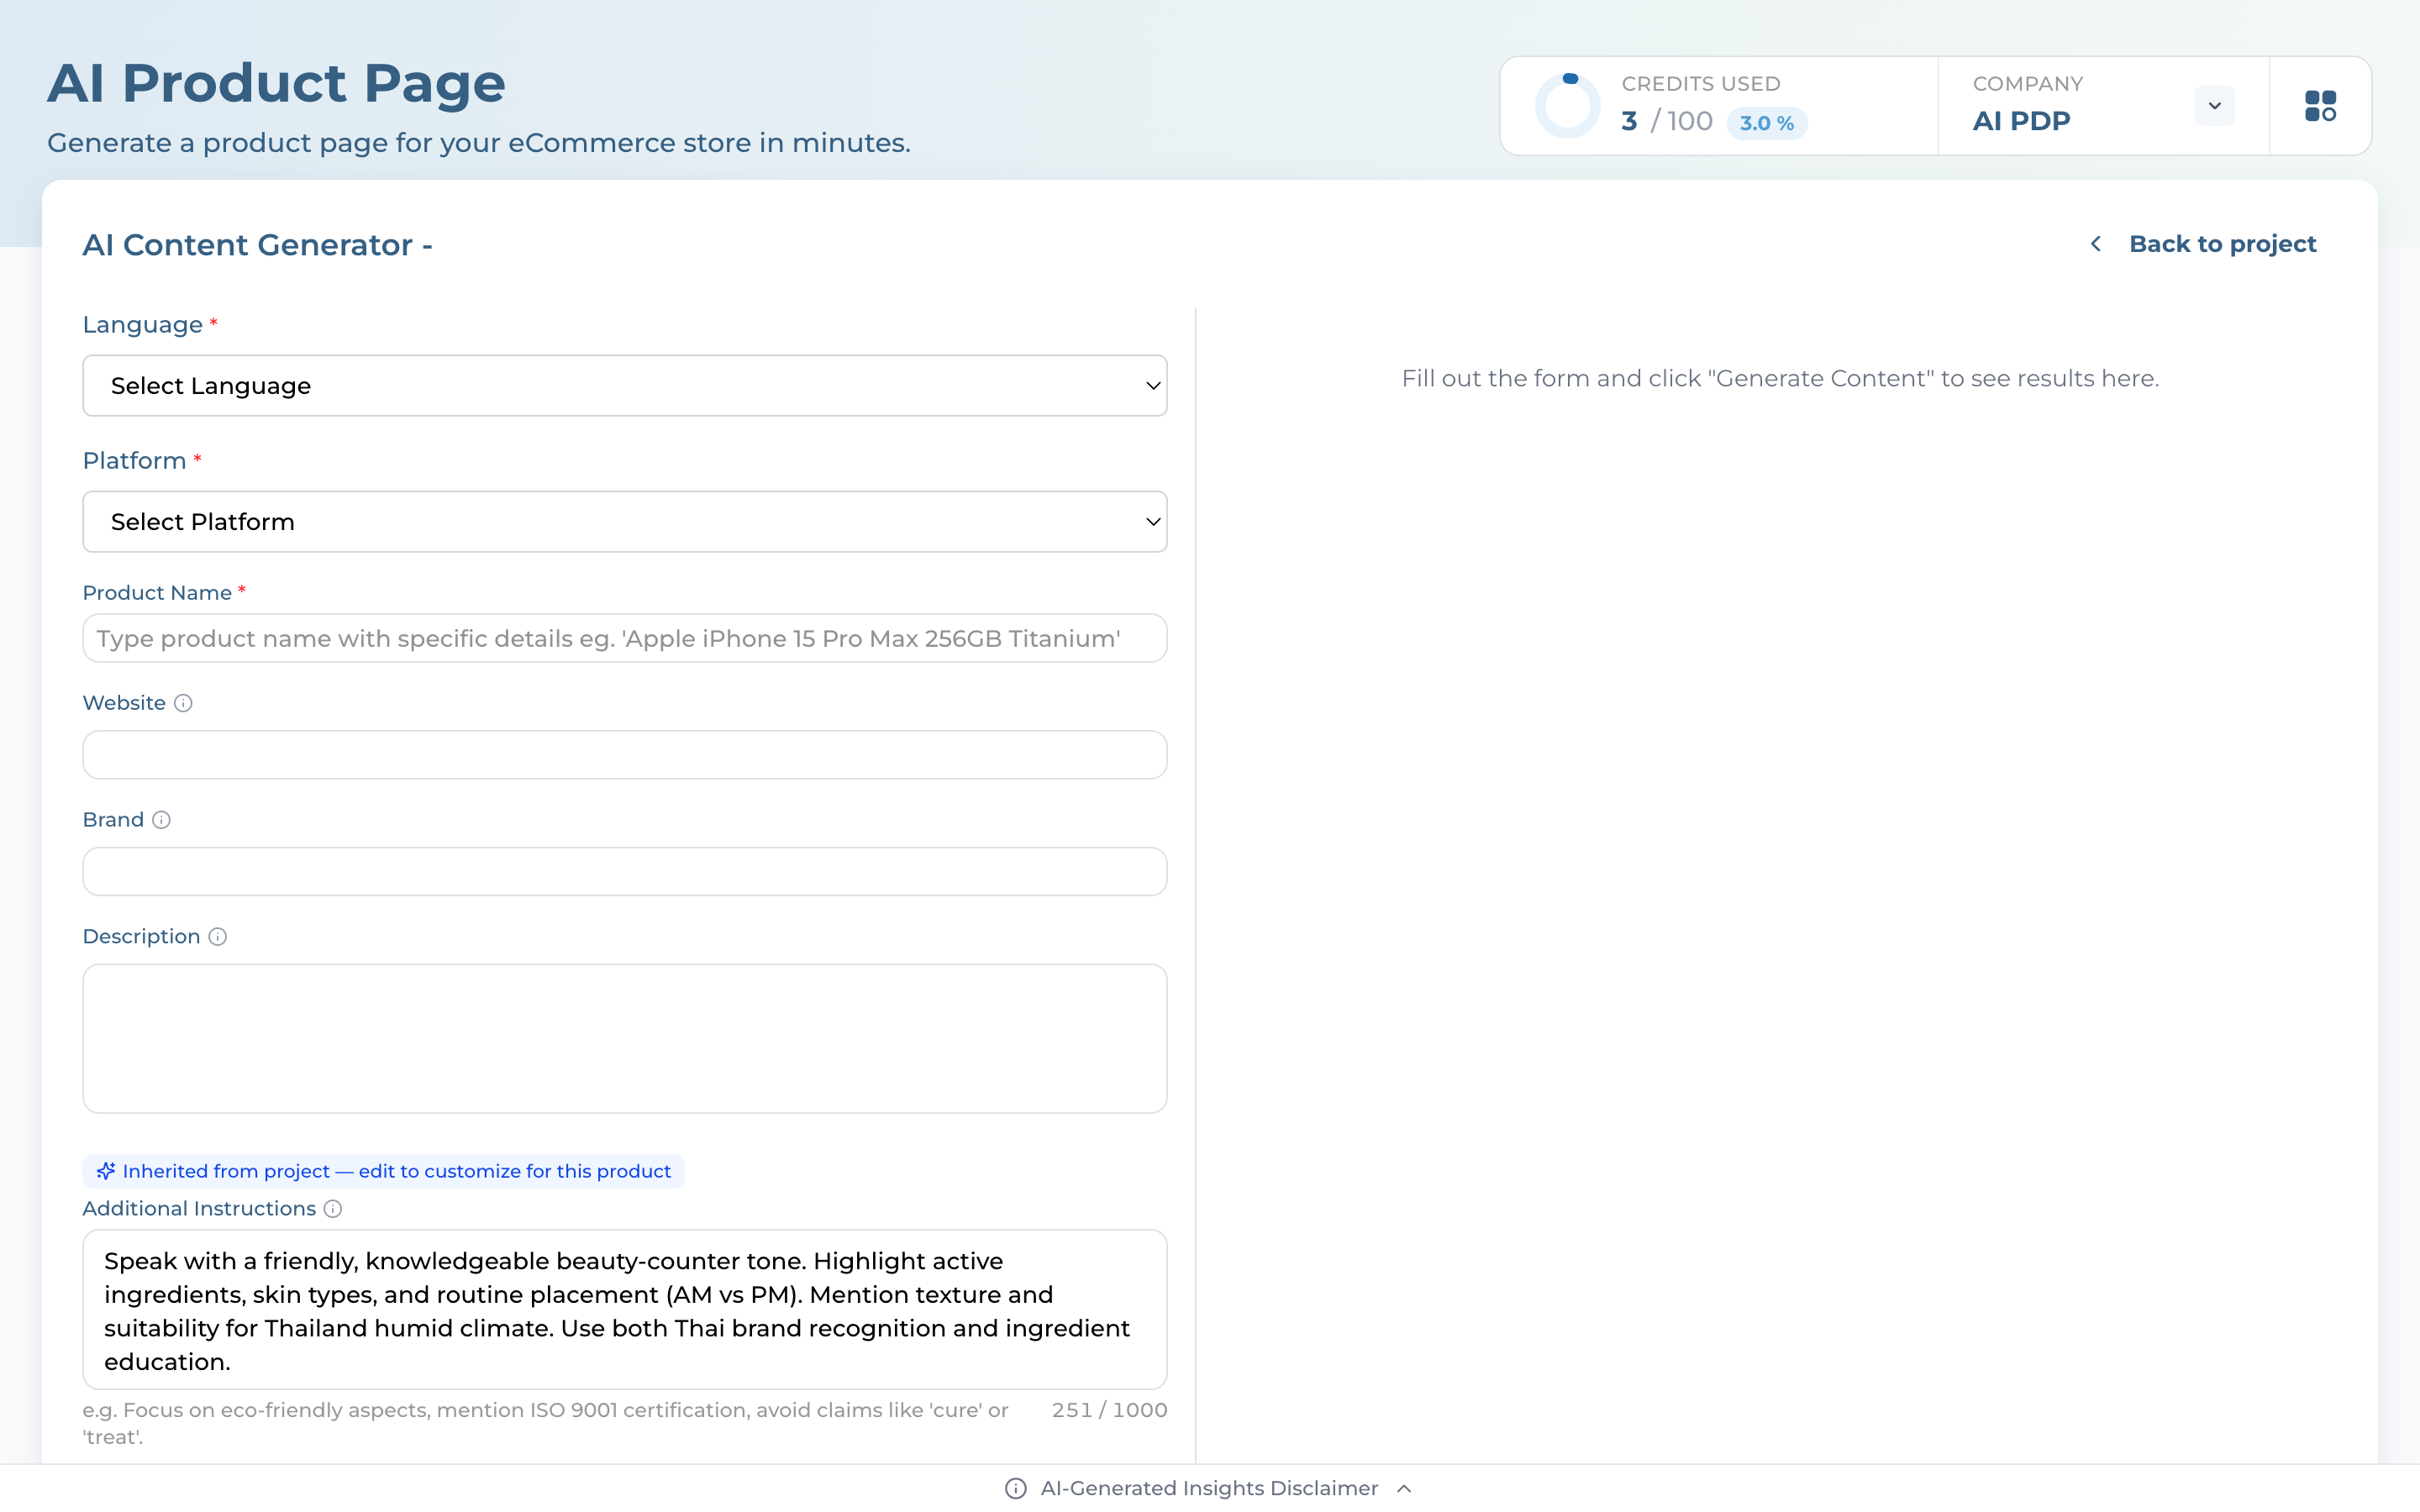
Fill Product Details
The top banner names the publish target — "Step through each section, then publish to {Marketplace} {Language}" — and the sticky bar holds Generate with AI (gated until Product Name is filled)
About this Product opens by default for new SKUs (auto-collapses once content exists). Only Product Name is required — include the variant (size, color) for best results
Content Brief holds the optional inputs that shape generation: Keywords (for SEO), Existing Product Description (your starter copy, up to 5,000 chars), Brand, Category, and Additional Instructions (tone, claims to avoid)
Step 7
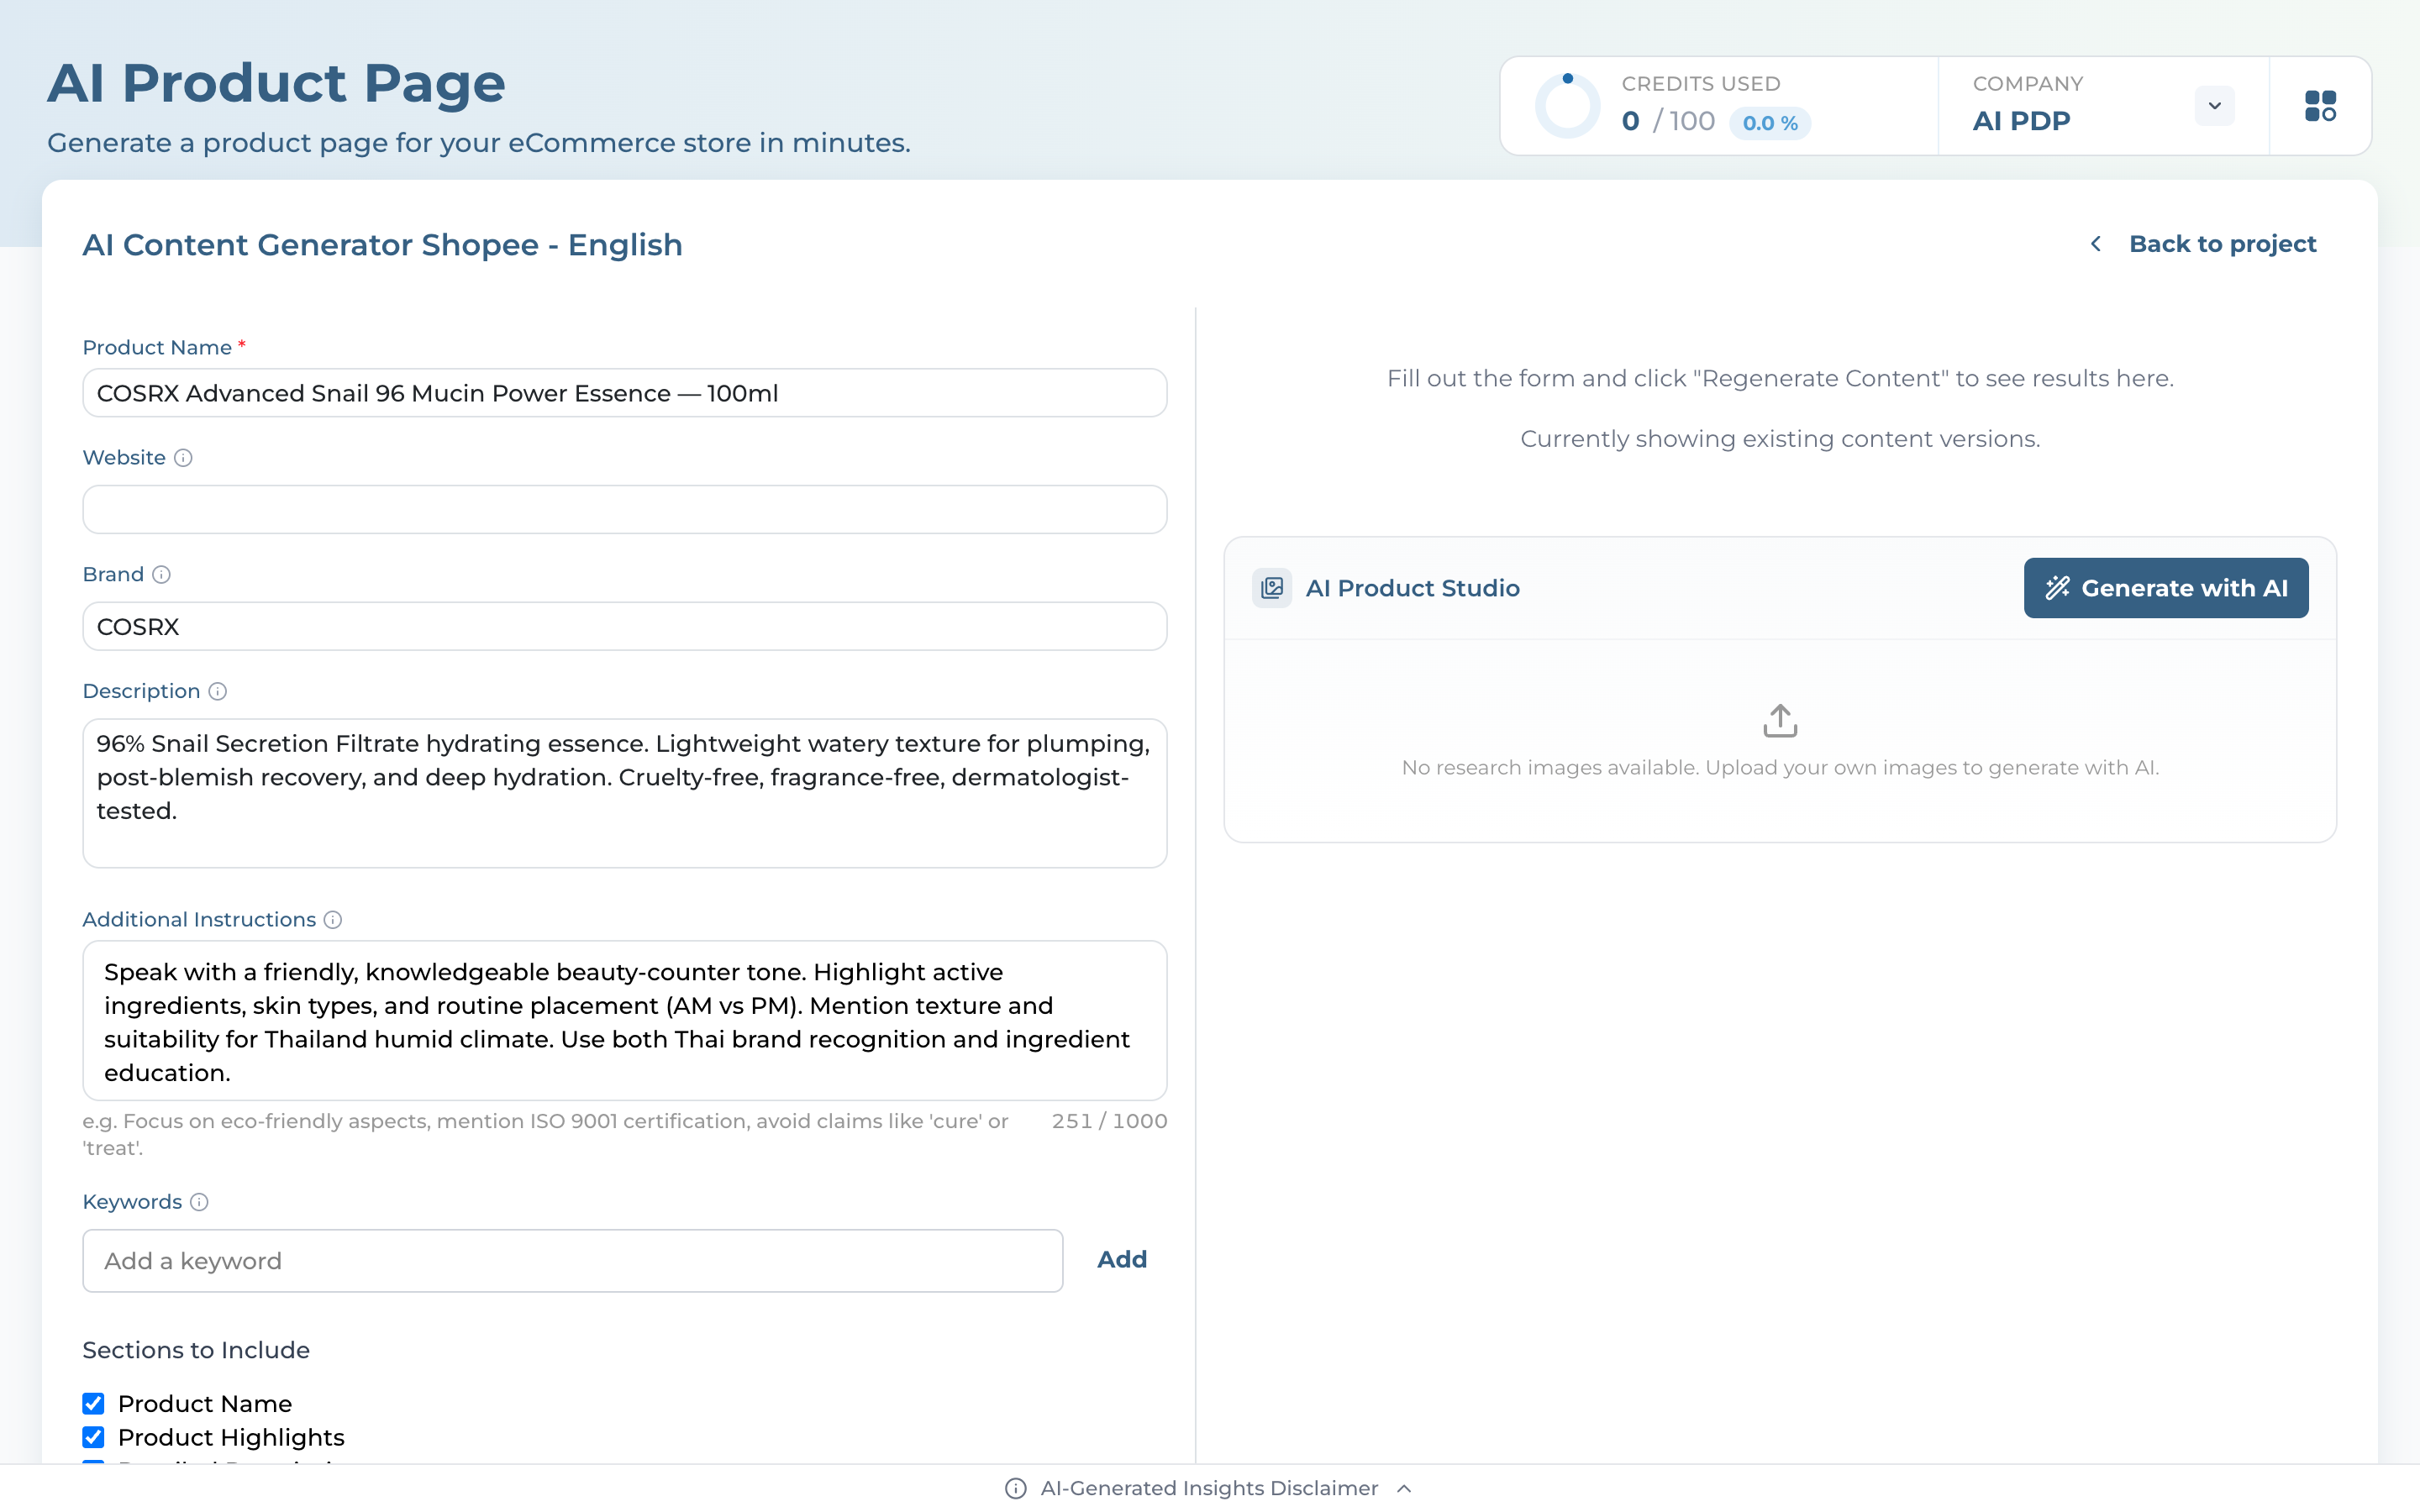
Generate & Review with Live Preview
Click "Generate with AI" — a staged progress dialog walks through research → write → refine, and the Real-time Preview on the right (Shopee / Lazada / TikTok / Tokopedia mockup) updates as each section lands
Four workflow rows appear once content exists: AI Generated Product Name, AI Generated Product Description, Specifications, and Images — each shows character count vs the platform limit (red warning if over)
Tap any row to edit inline — Cancel / Save changes pills. Your edits mirror into the preview live, and the preview tabs (Gallery / Product name / Description / Specs) scroll the marketplace mockup to that section
05
Generate Content
One click. Optimized copy + marketplace metadata in seconds.
Step 8
Review Generated Content
Click "Generate with AI" on the sticky bar — a staged progress dialog walks through research → write → refine, then the four workflow rows light up with content
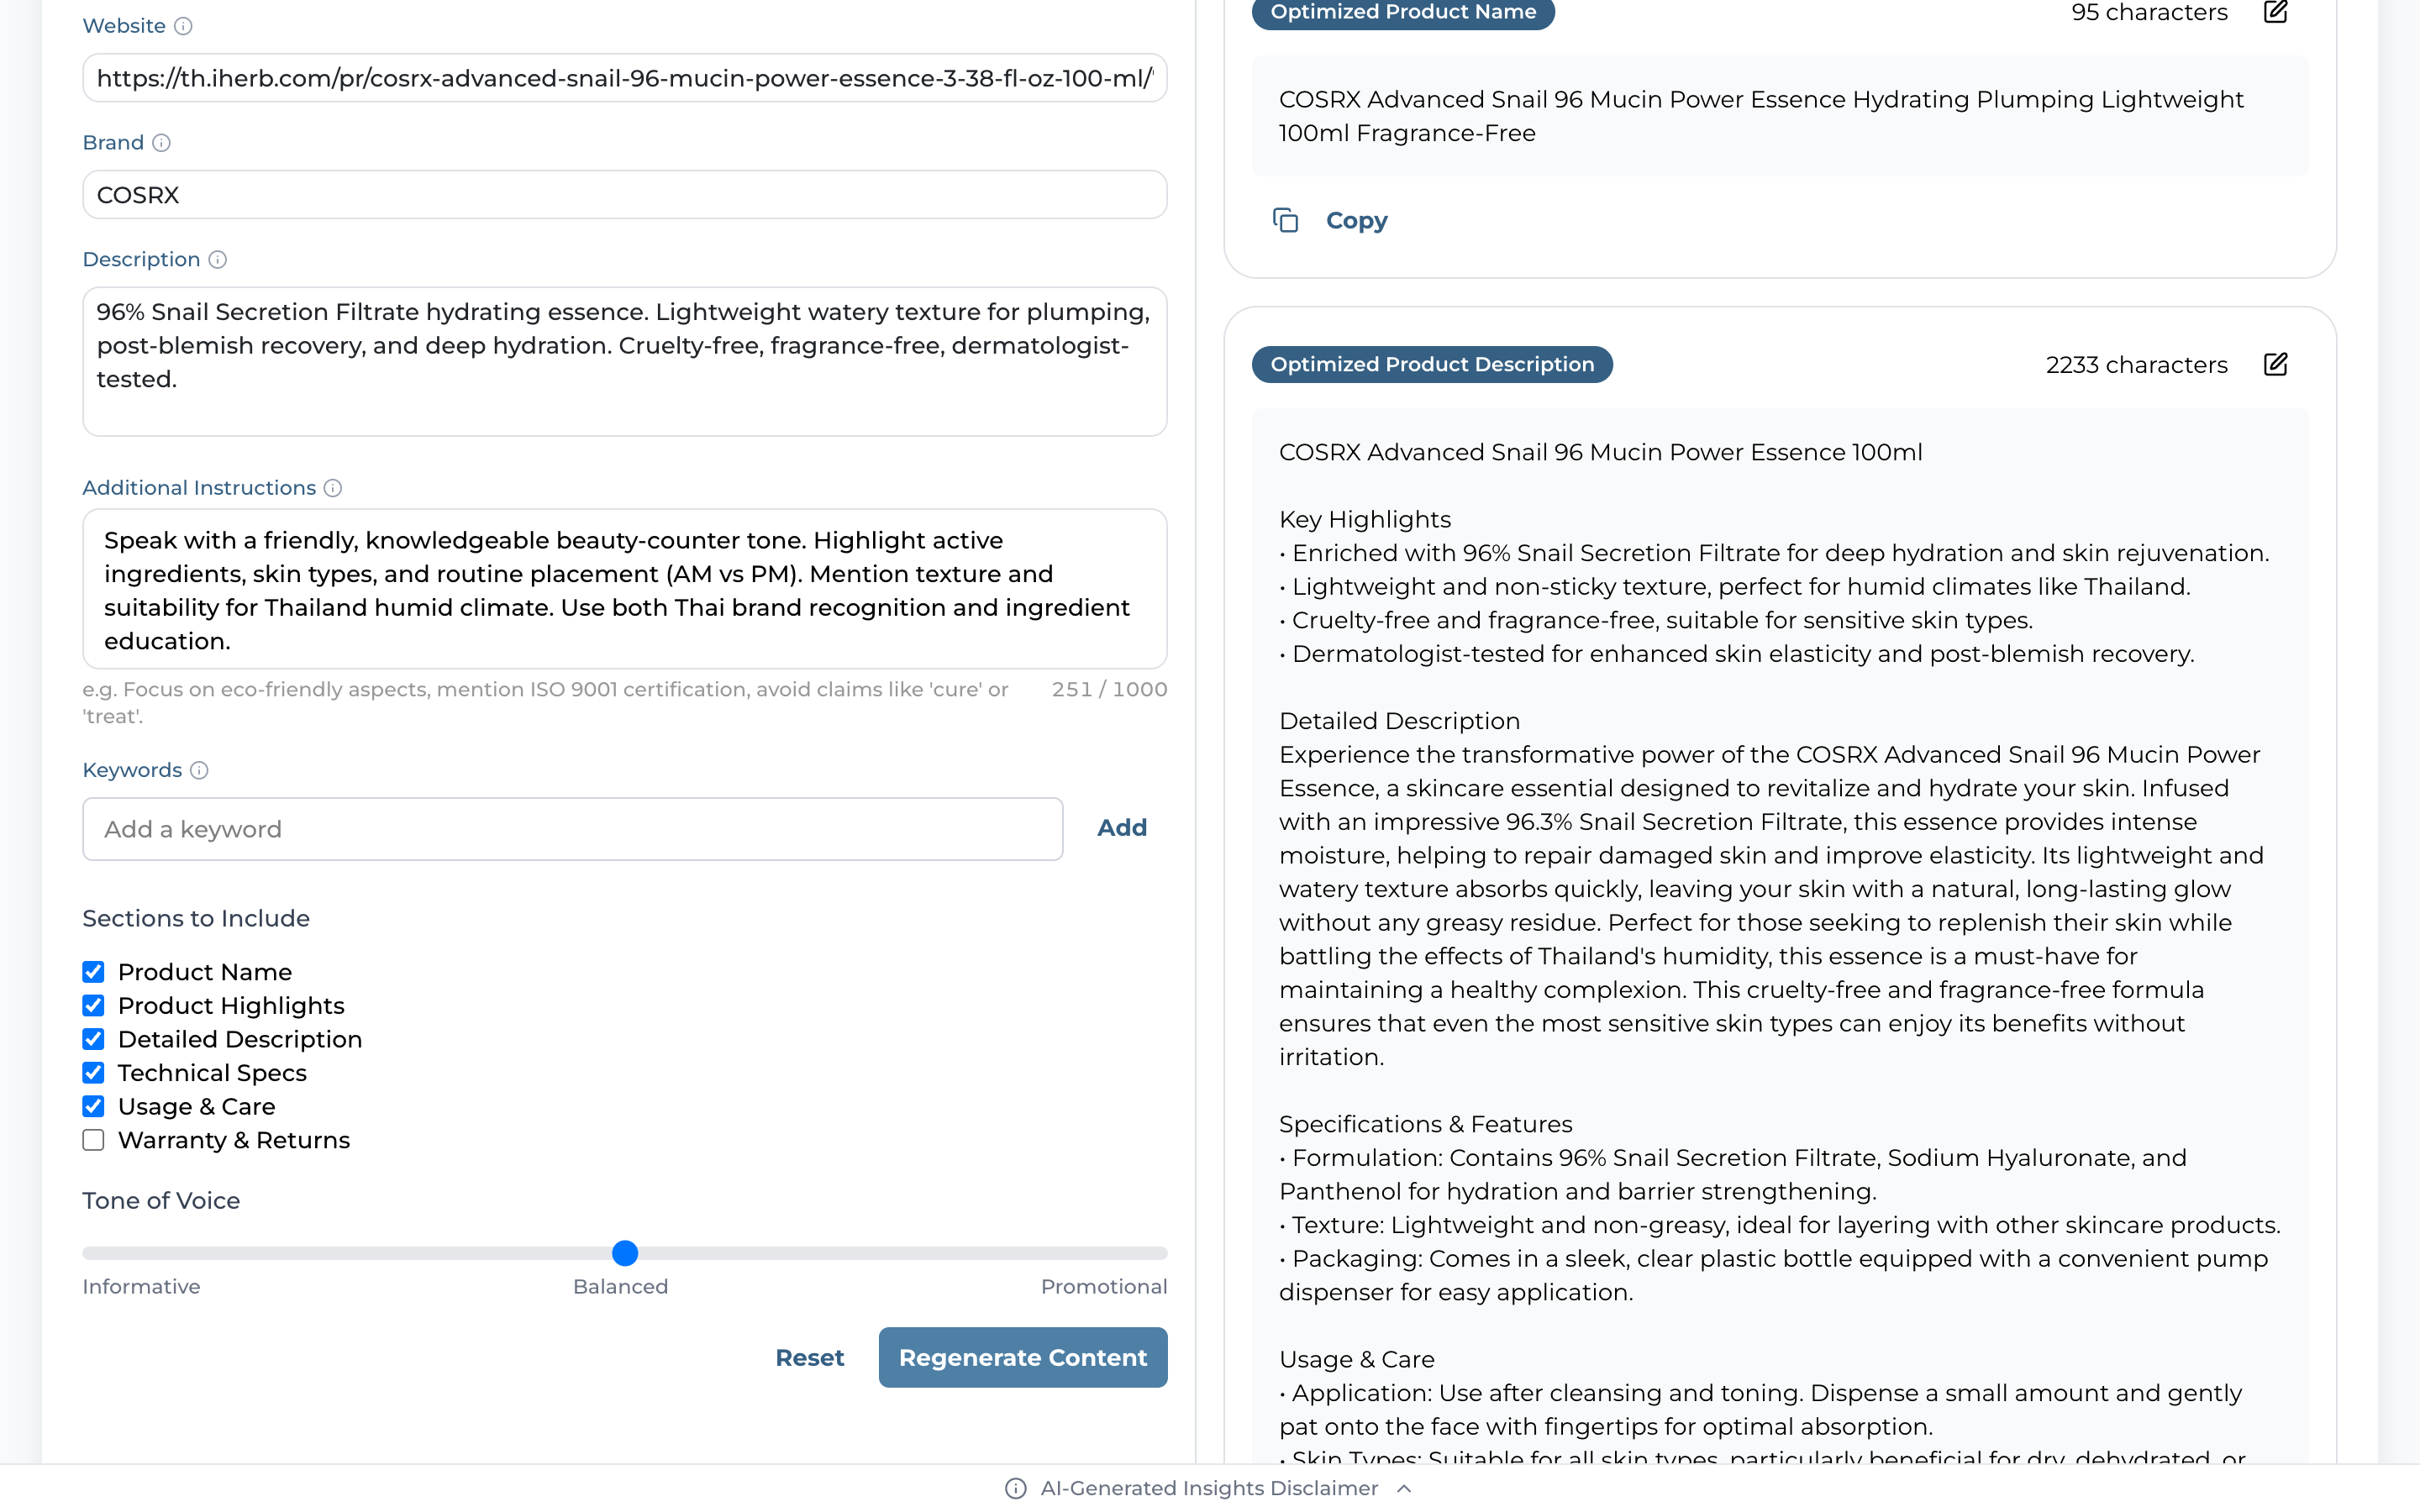
AI Generated Product Name — keyword-rich title with character count (e.g. 94 / 110 — Shopee TH's cap). A red badge appears the moment you go over
AI Generated Product Description — structured body with Key Highlights, Detailed Description, Specifications, Usage & Care. Tap Edit to refine inline (Cancel / Save changes pills) or Copy to grab the whole block
1 credit per generation
Step 9
Review Marketplace Fields
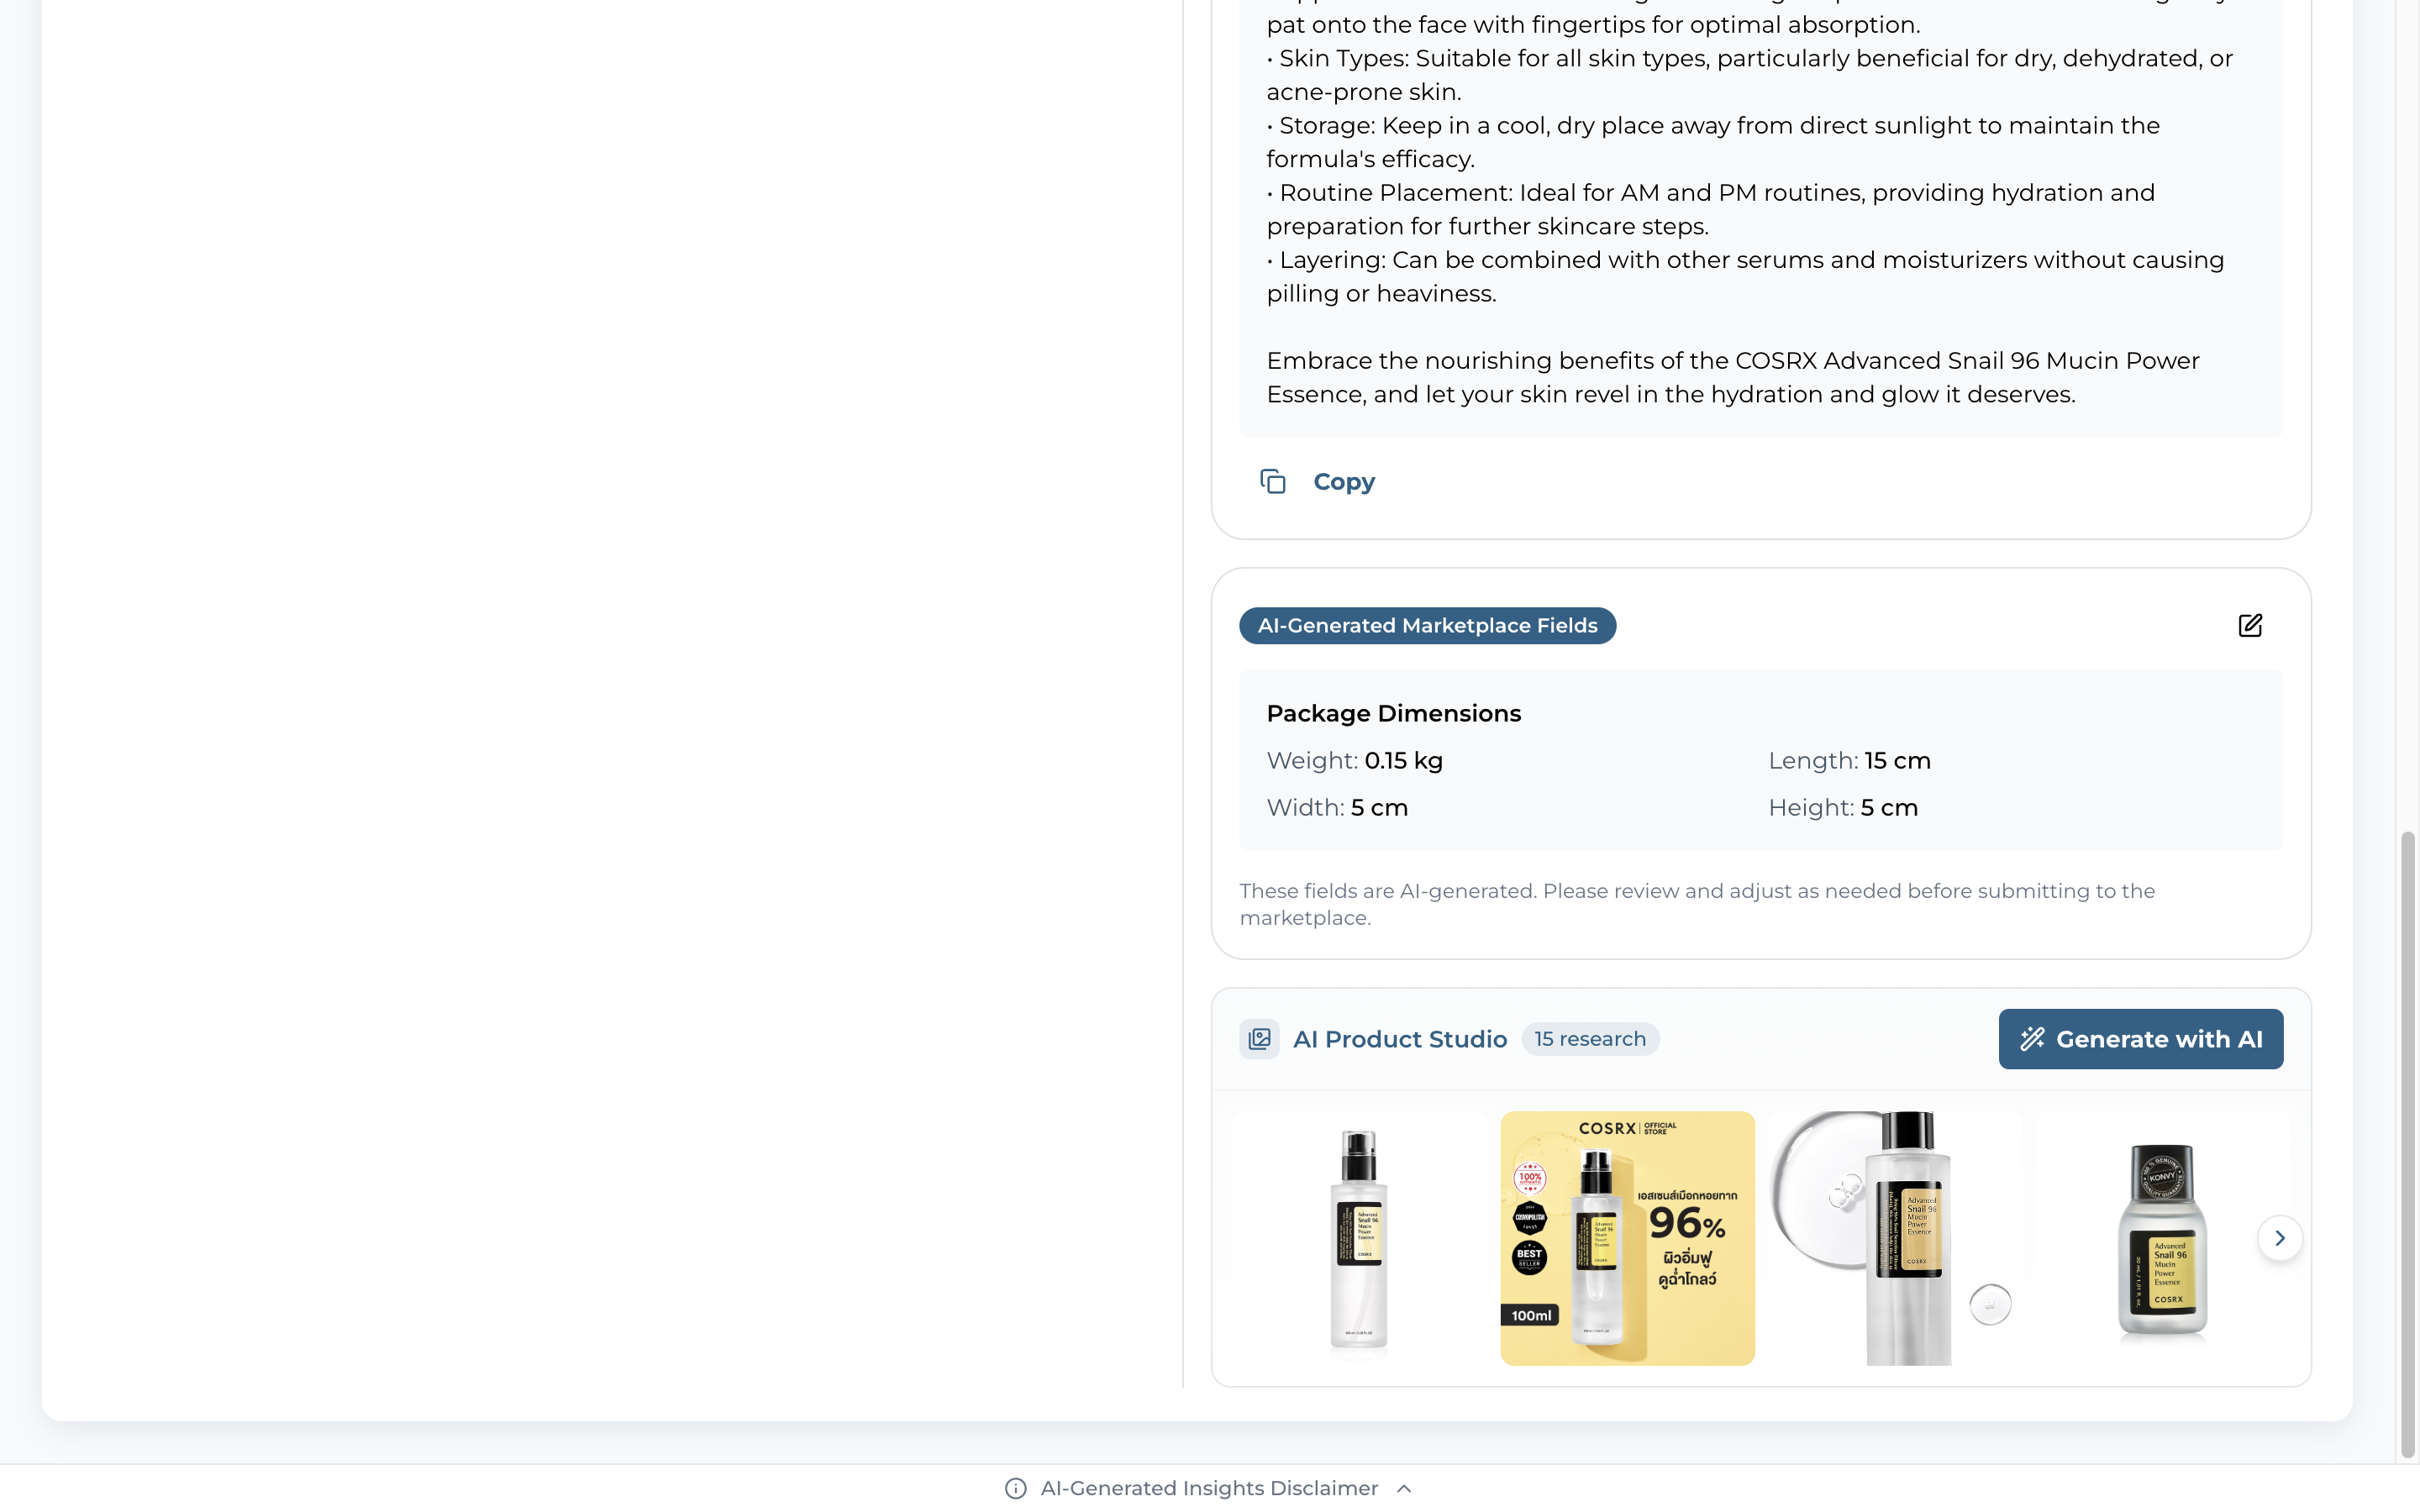
Open the Specifications workflow row (marketplace SKUs only — website PDPs skip this) to see the FEATURES grid the AI inferred from your product
Package Dimensions — Weight (kg), Length, Width, Height (cm) — pre-filled for shipping calculators; the row caption nudges "AI-generated. Please review before publishing."
The Images row below carries the research-image carousel — review thumbnails before publishing or jump to Generate Images for the AI Product Studio
06
Generate Product Images
AI Product Studio — research images + Reimagine + Infographic in one panel
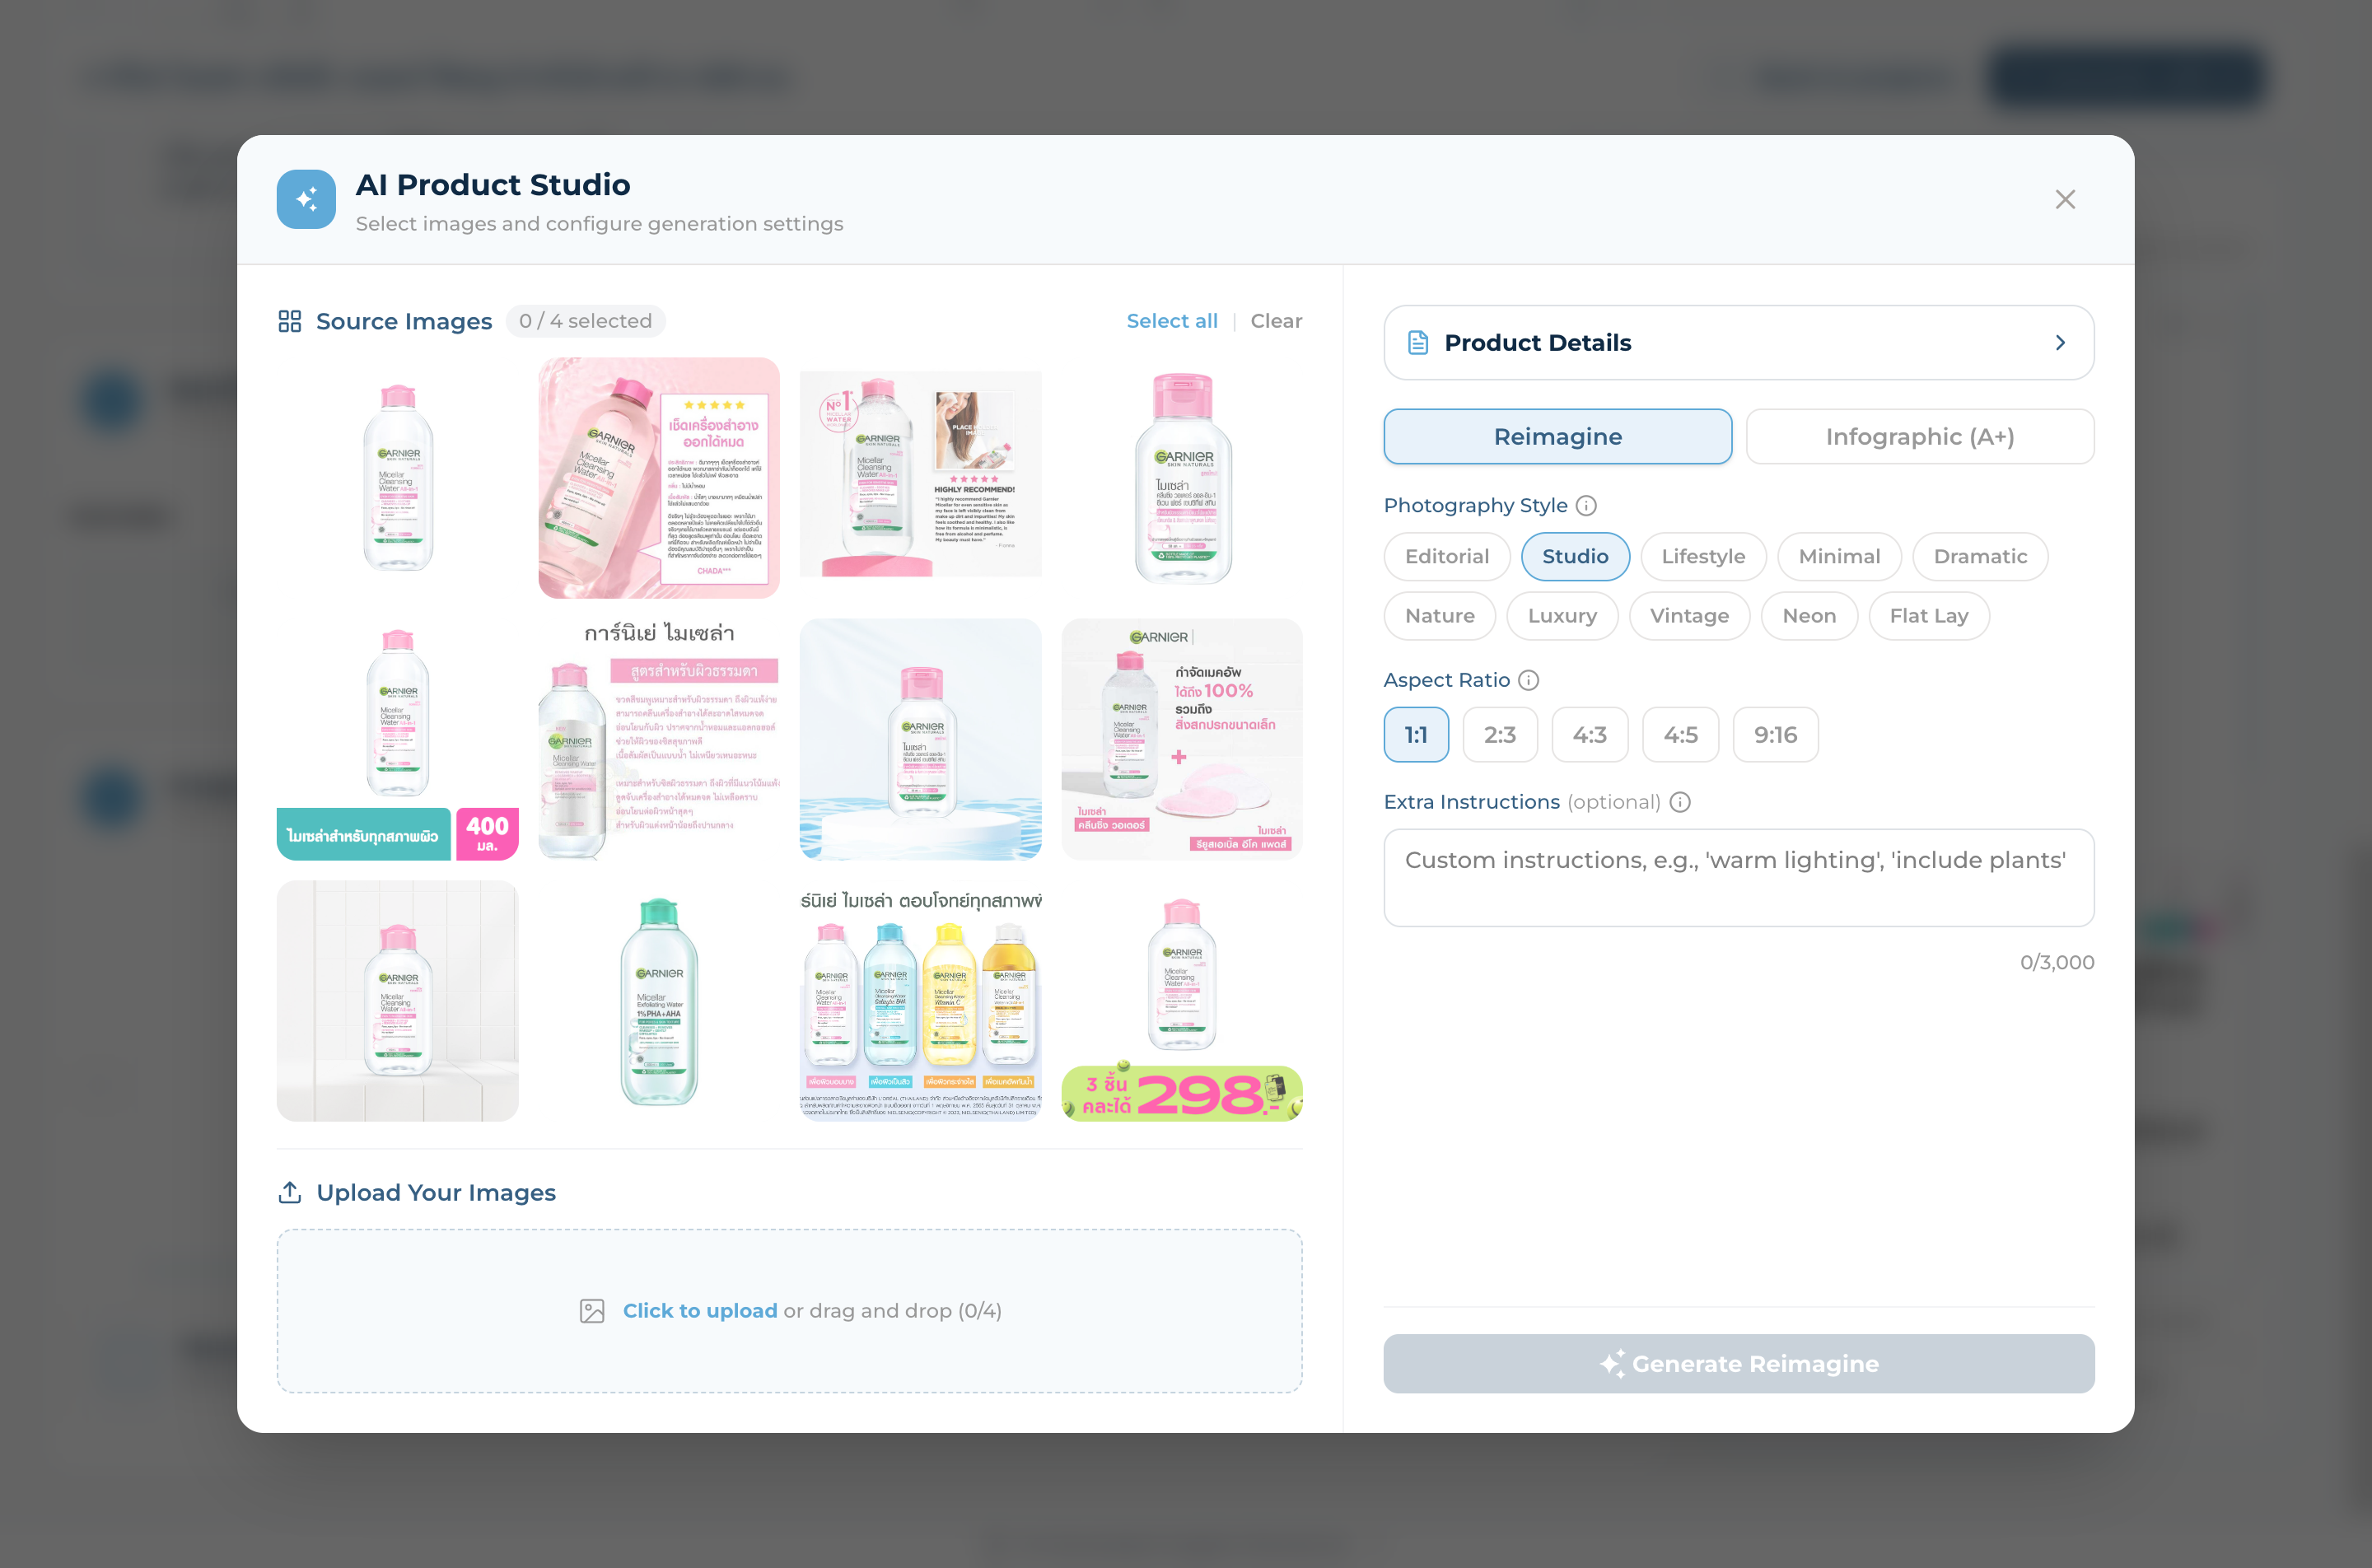
Step 10
Open AI Product Studio
Click "Generate Images" in the Images workflow row — the AI Product Studio modal opens on top of the PDP
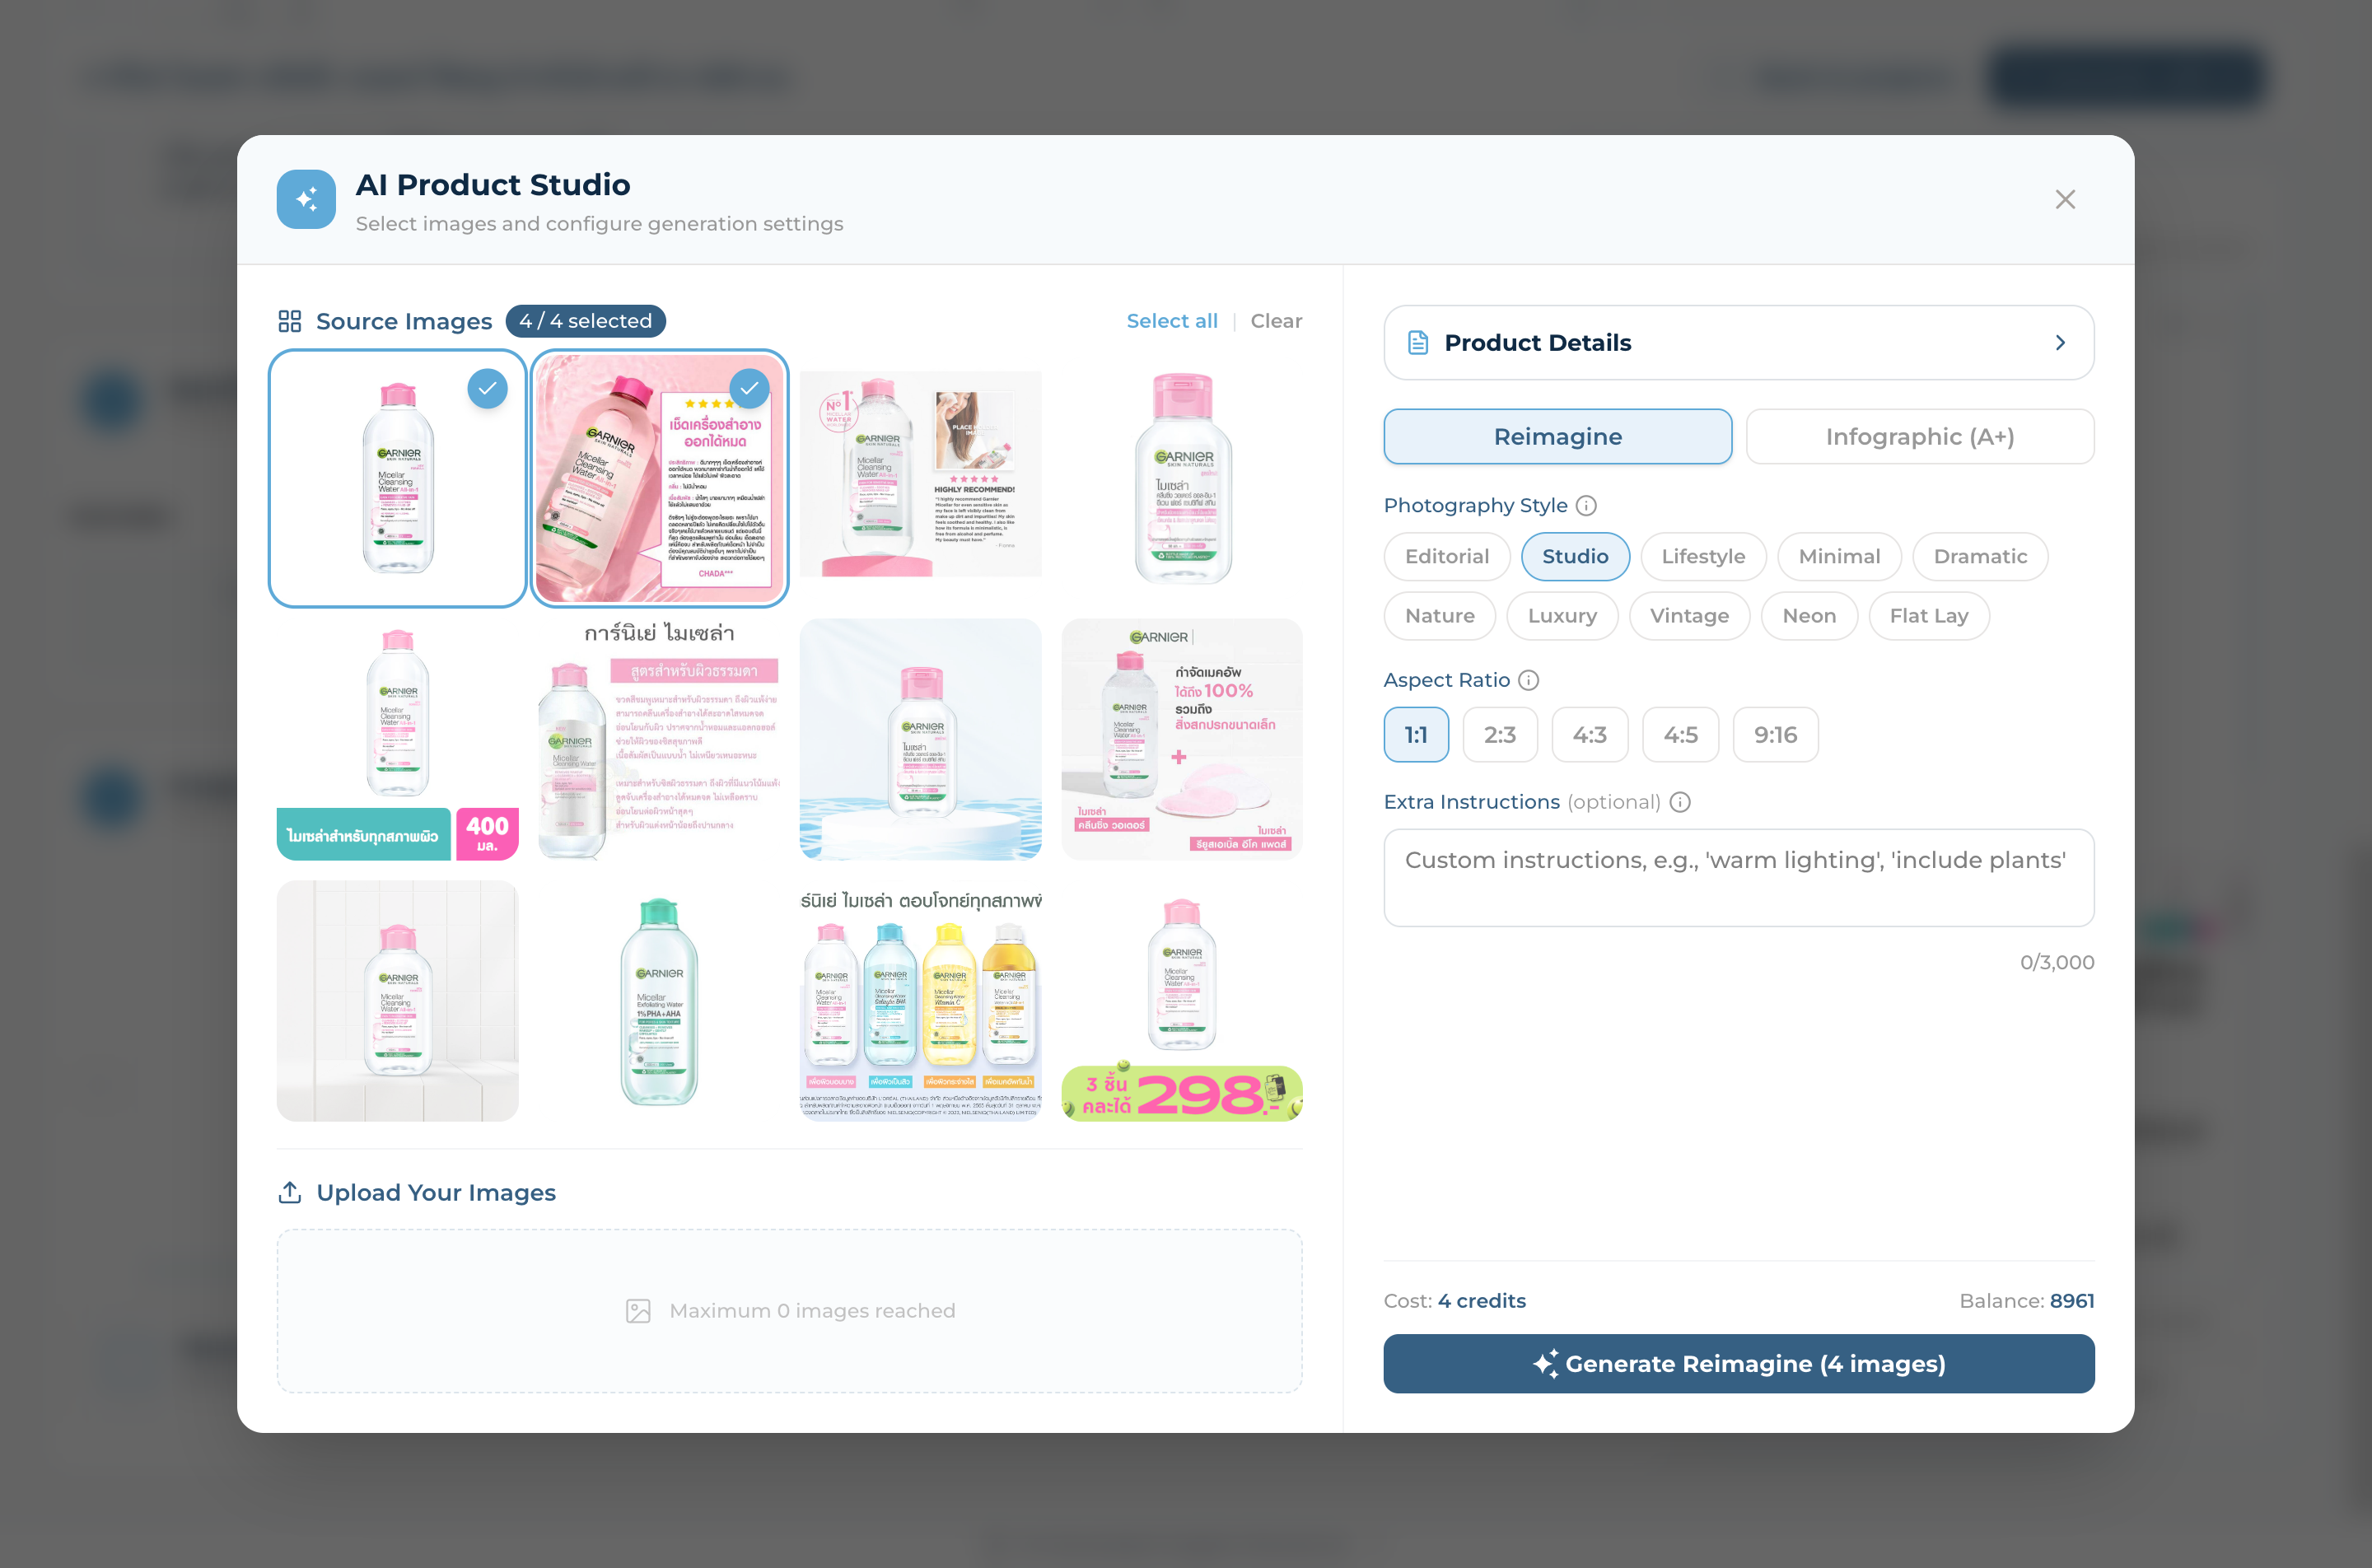
Left pane shows auto-collected Source Images (often 15+ from the web) with Select all / Clear shortcuts — counter shows 0 / 4 (Reimagine) or 0 / 10 (Infographic)
No good source? Upload Your Images via the drag-and-drop tray below the grid, or open Product Details on the right for live PDP context
Pick an Aspect Ratio — 1:1, 2:3, 4:3, 4:5, 9:16 — to match your marketplace's image specs
Add Extra Instructions (up to 3,000 chars) like "warm lighting, include plants", then click "Generate Reimagine" — disabled until at least one source is selected
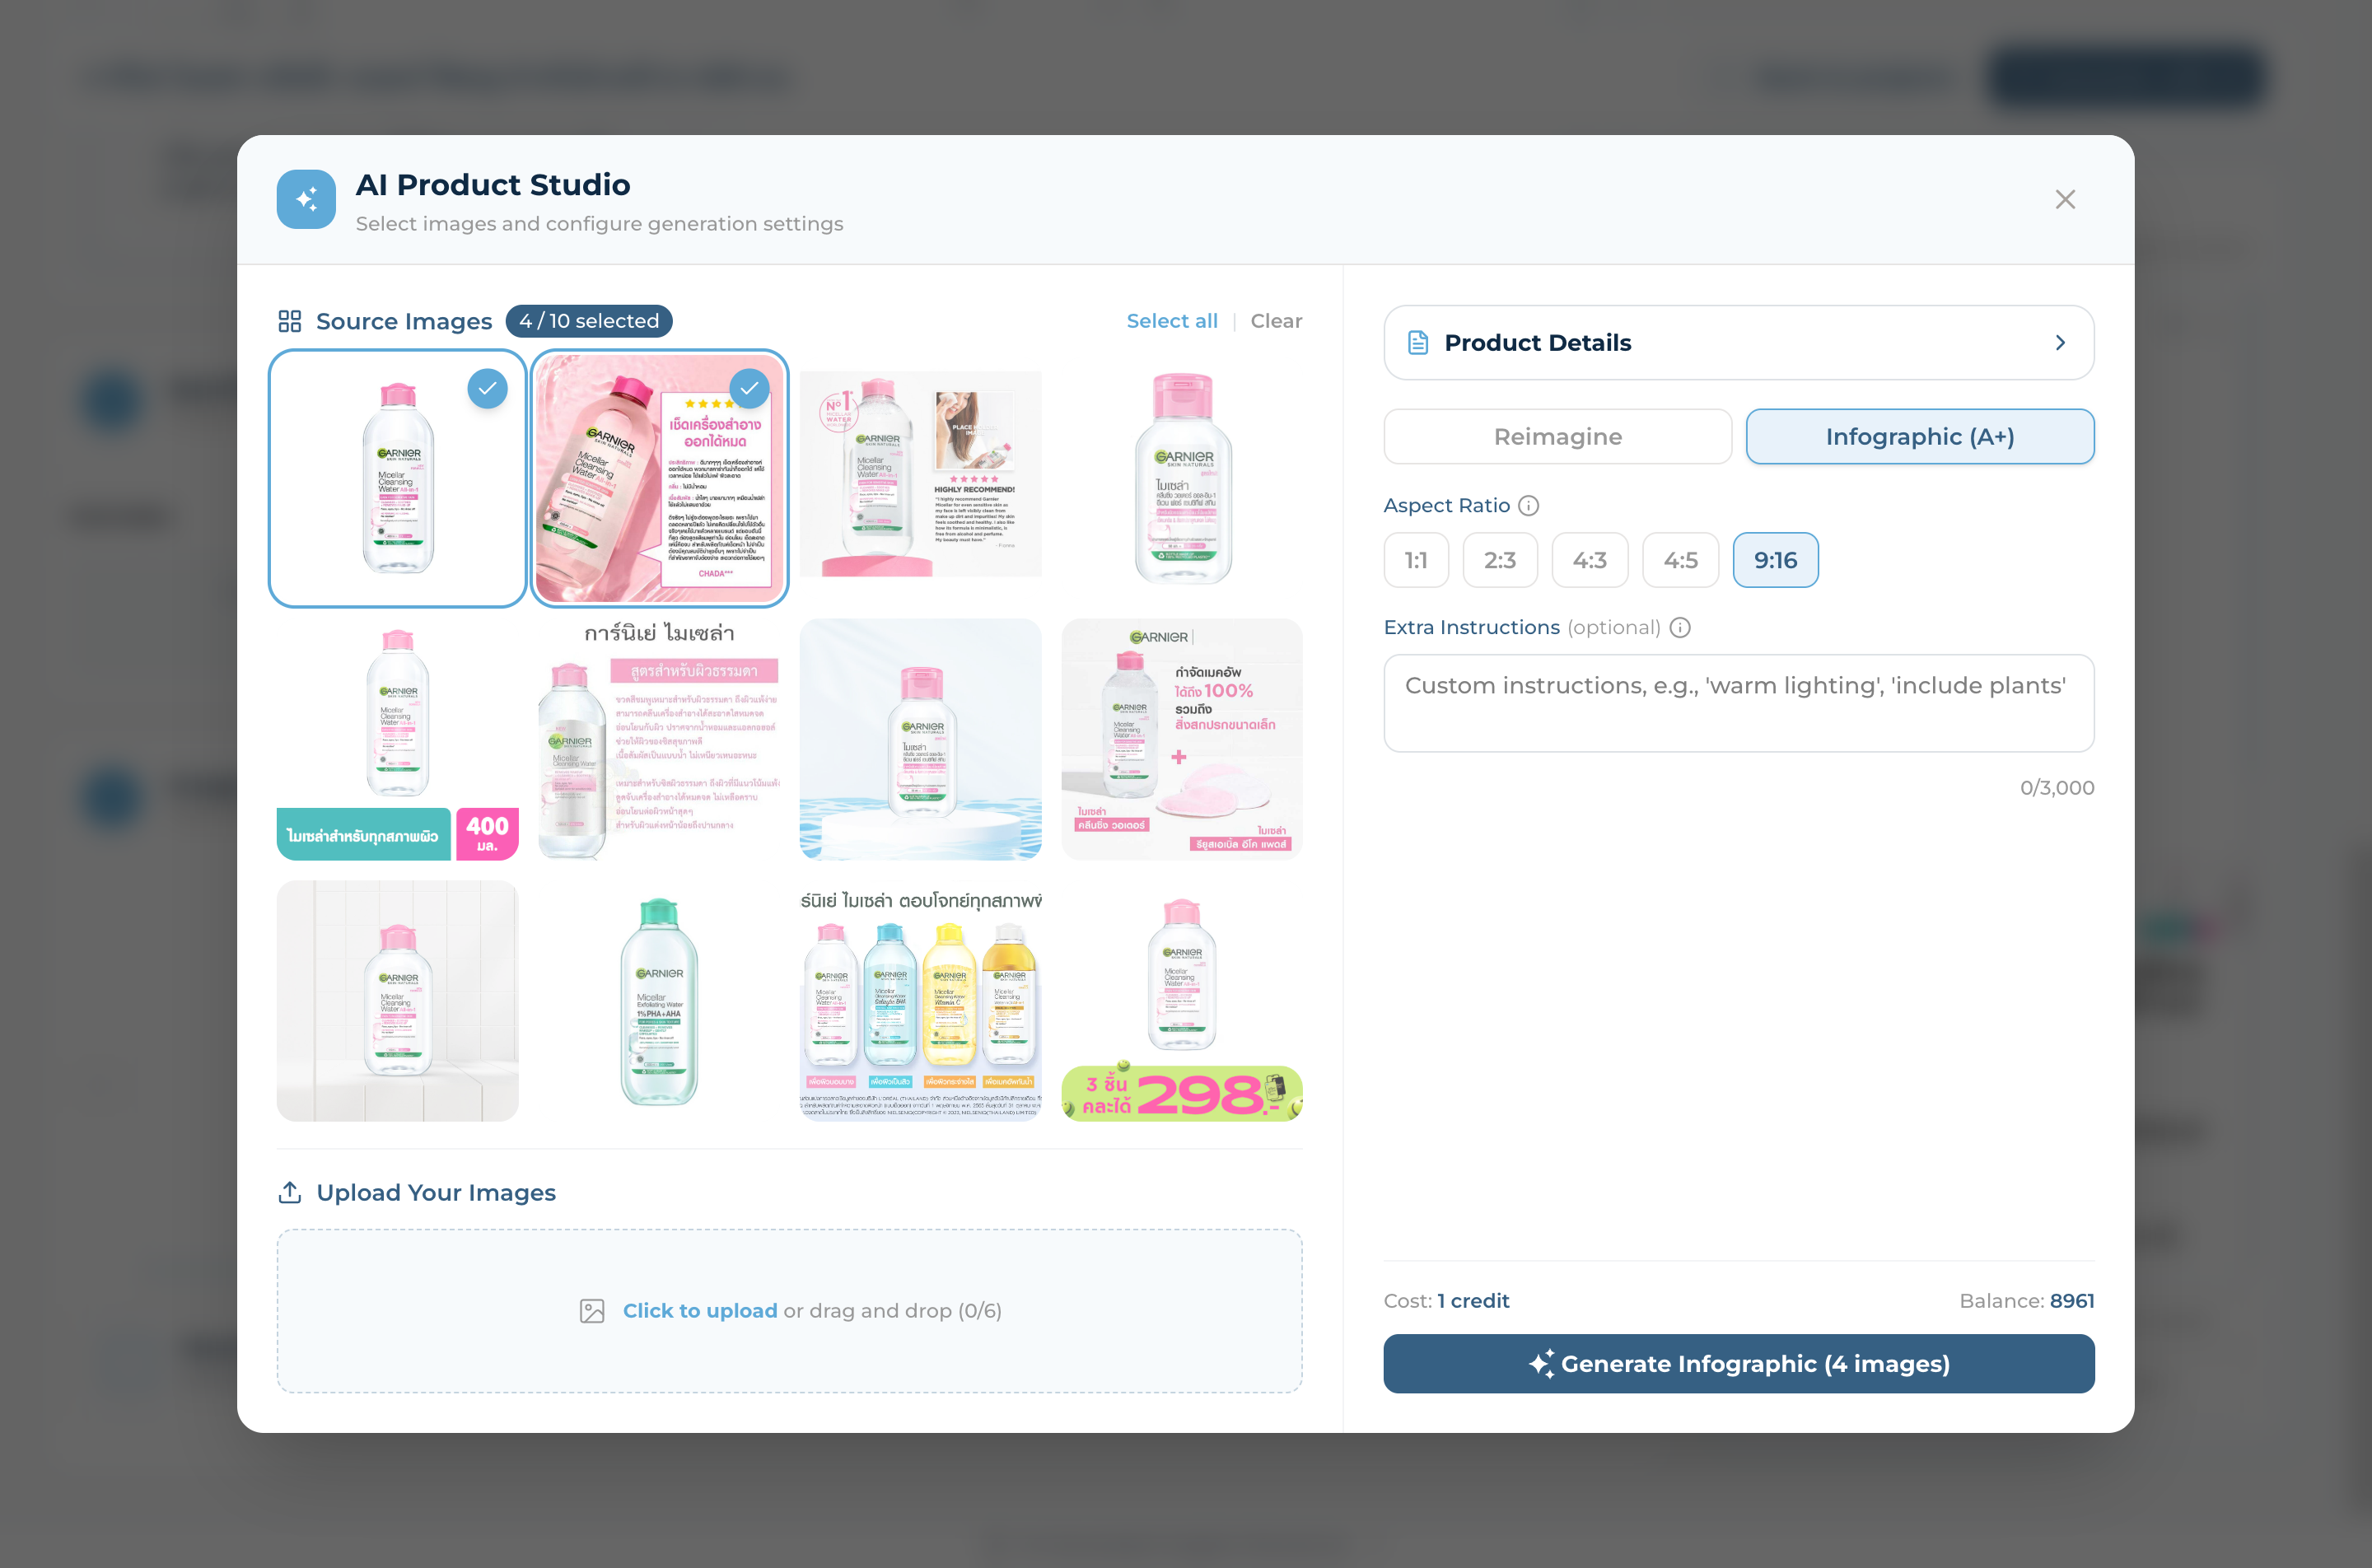
Step 12
Infographic (A+) — Marketing Layouts
Switch to the Infographic (A+) tab to generate richer marketing graphics with text overlays, callouts, and benefit hierarchies
Combine up to 10 source images into one composition — perfect for Shopee/Lazada A+ content blocks
Choose Aspect Ratio and add Extra Instructions, then click "Generate Infographic". The footer shows the cost (1 credit per output) and your remaining credit balance
07
Track Workflow
See every product's status at a glance and keep credits in check
Step 13
Status Changes Automatically
Click "Back to project" — each product's status badge updates from New → Done the moment a generation completes successfully
The filter tabs recount in real time: All (2), New (0), Review (0), Done (2)
The top-bar "CREDITS USED" counter increments by 1 per generation — watch it climb during bulk runs
Lifecycle: PENDING → PROCESSING → DONE (auto-DONE after 3 failures)
Step 14
Switch to Grid View
Toggle the Grid view icon (top right of the product list) to see each product as a visual card — thumbnail, status badge, name, brand, platform, and language at a glance
Best when your products are image-heavy (cosmetics, fashion, food) — quickly spot missing photos or off-brand thumbnails without opening each PDP
All filters (status, language, platform, search) work identically in both views — switch back to List view when scanning many SKUs by metadata
08
Export Your PDPs
Send finished pages to your marketplace seller centre in one file
Step 15
Filter & Export
Filter products by status, language, or platform to focus on the batch you want to ship
Click "Export All XLSX" to download a marketplace-ready spreadsheet with optimized names, descriptions, marketplace fields, and image URLs
Upload the file directly into Shopee Seller Centre, Lazada Seller Center, TikTok Shop, or Tokopedia bulk-import to publish in minutes
09
Manage Projects
Browse, search, rename, and clean up your library
Step 16
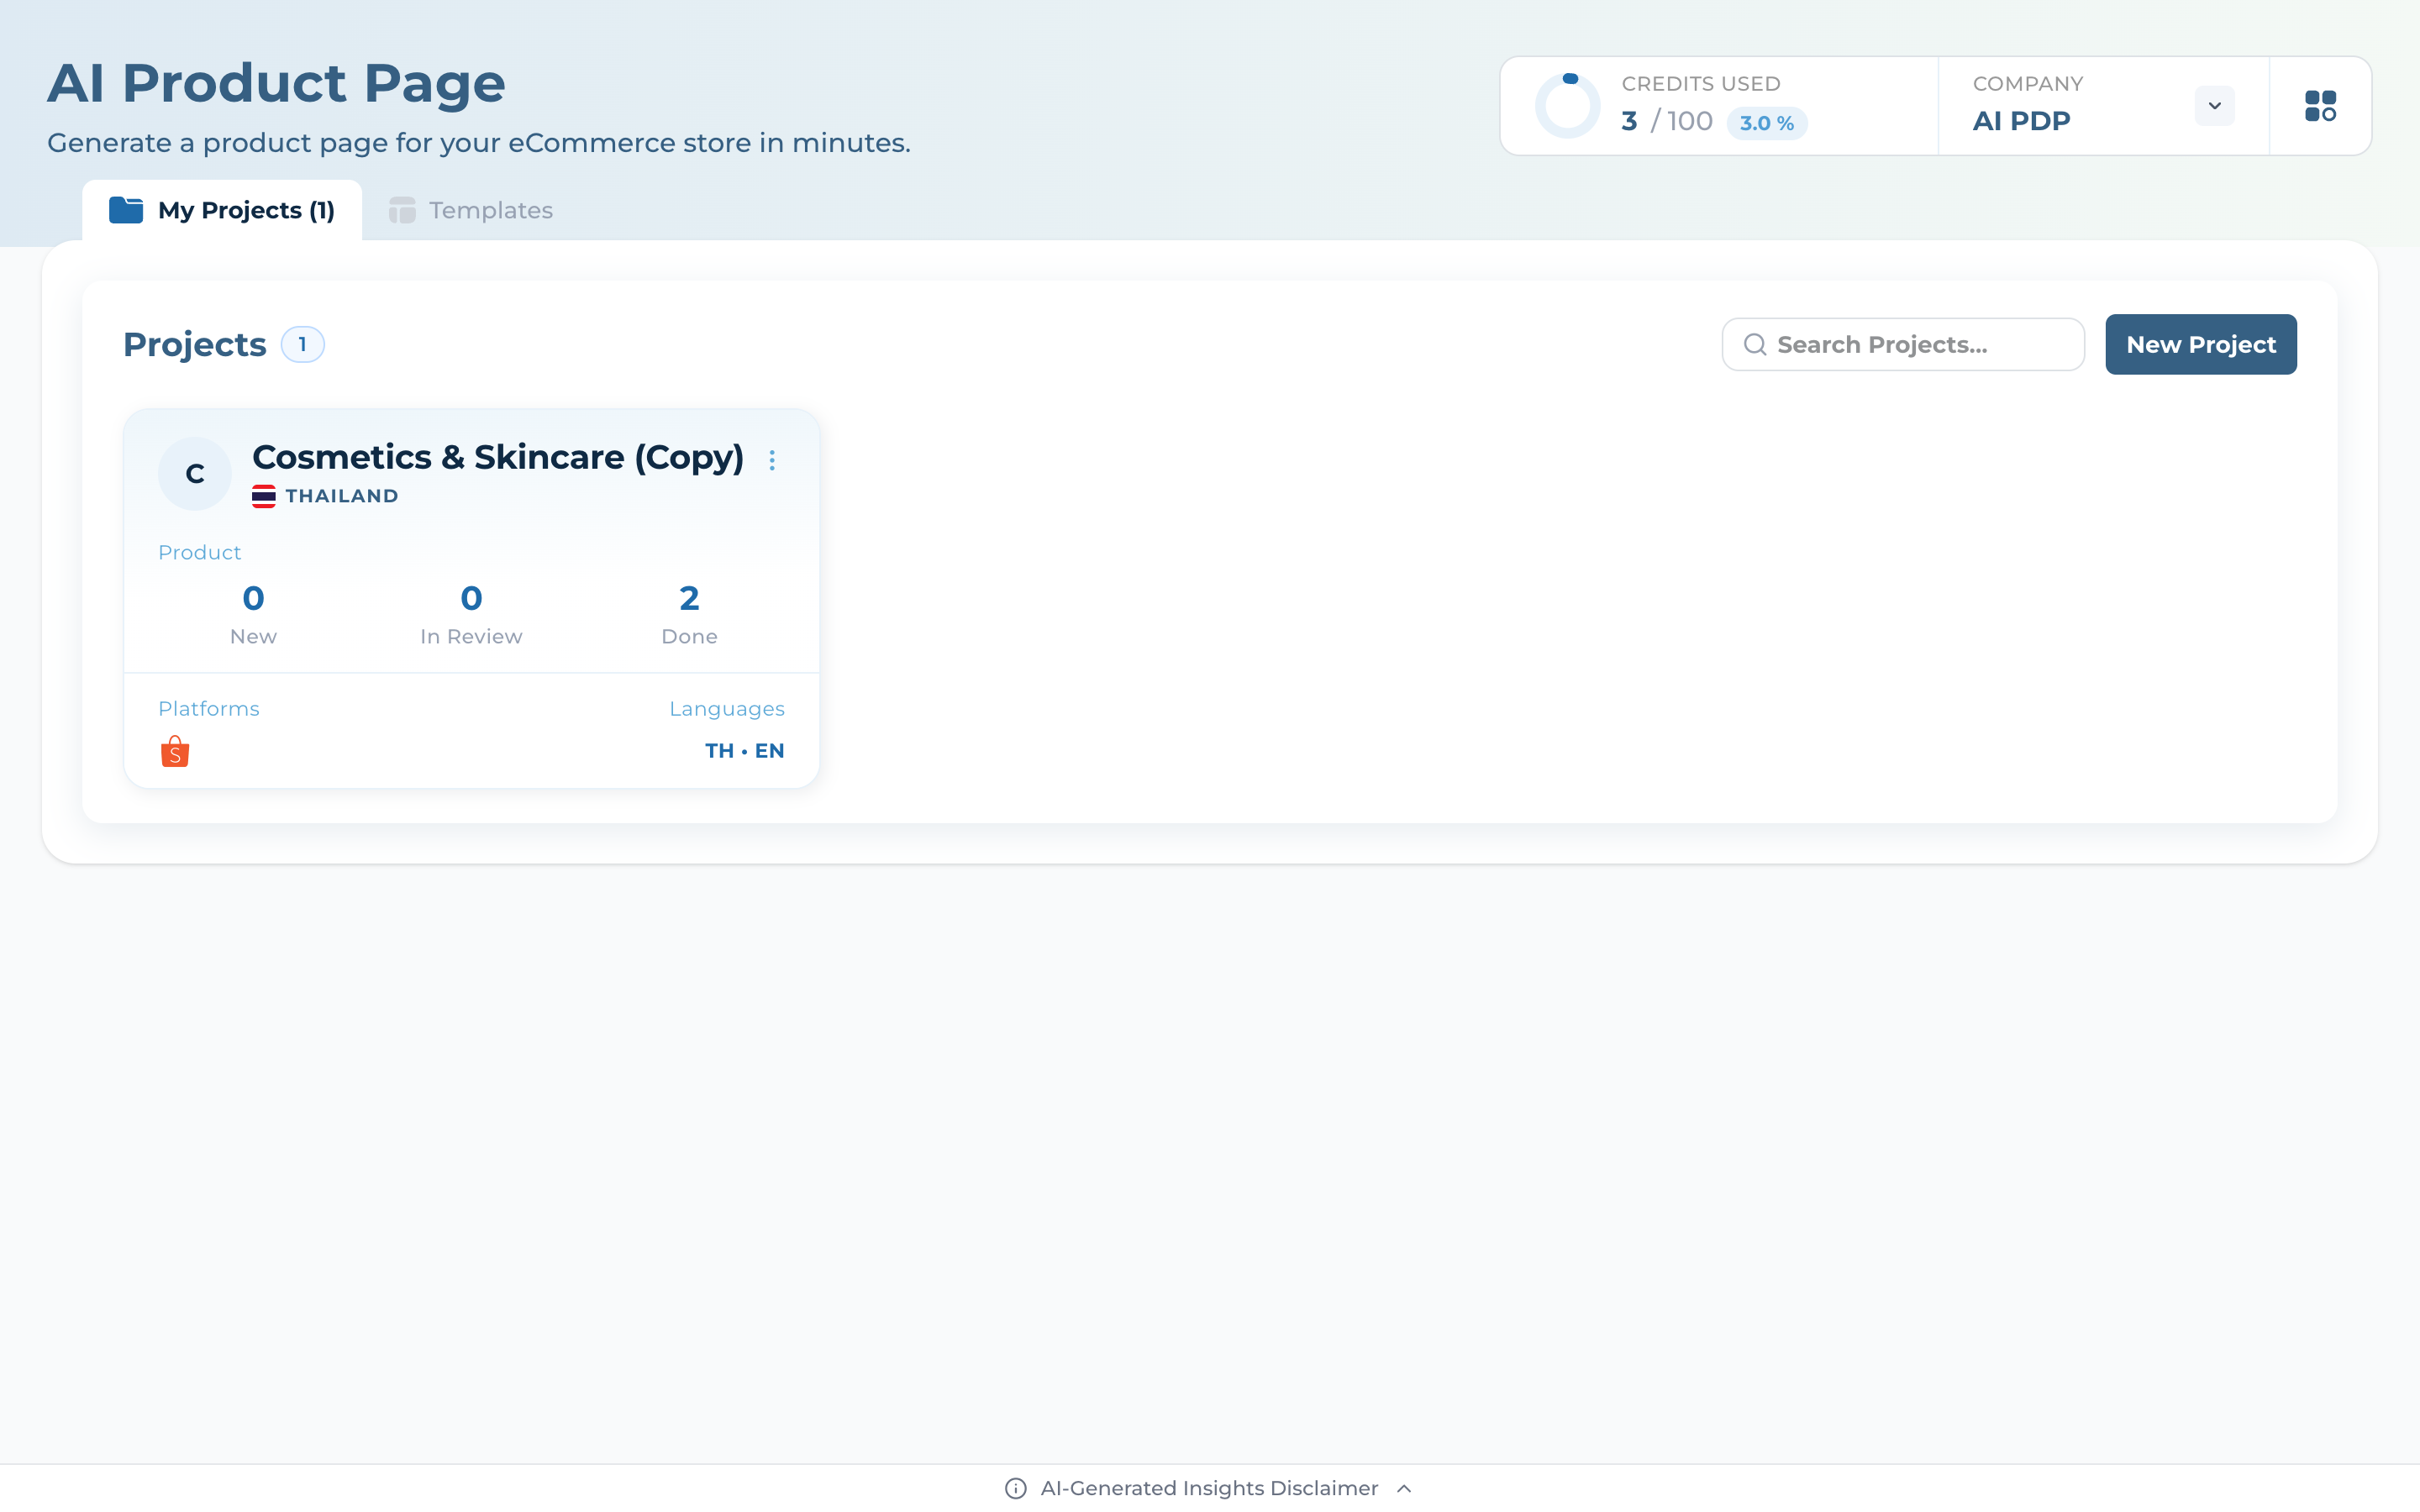
Browse My Projects
Switch to "My Projects" in the top tablist to see every project under your current organization
Use "Search Projects..." to find one quickly when your library grows past a handful
Click "+ New Project" (top right) to start a fresh blank project, or revisit Templates to clone another preset
Step 17
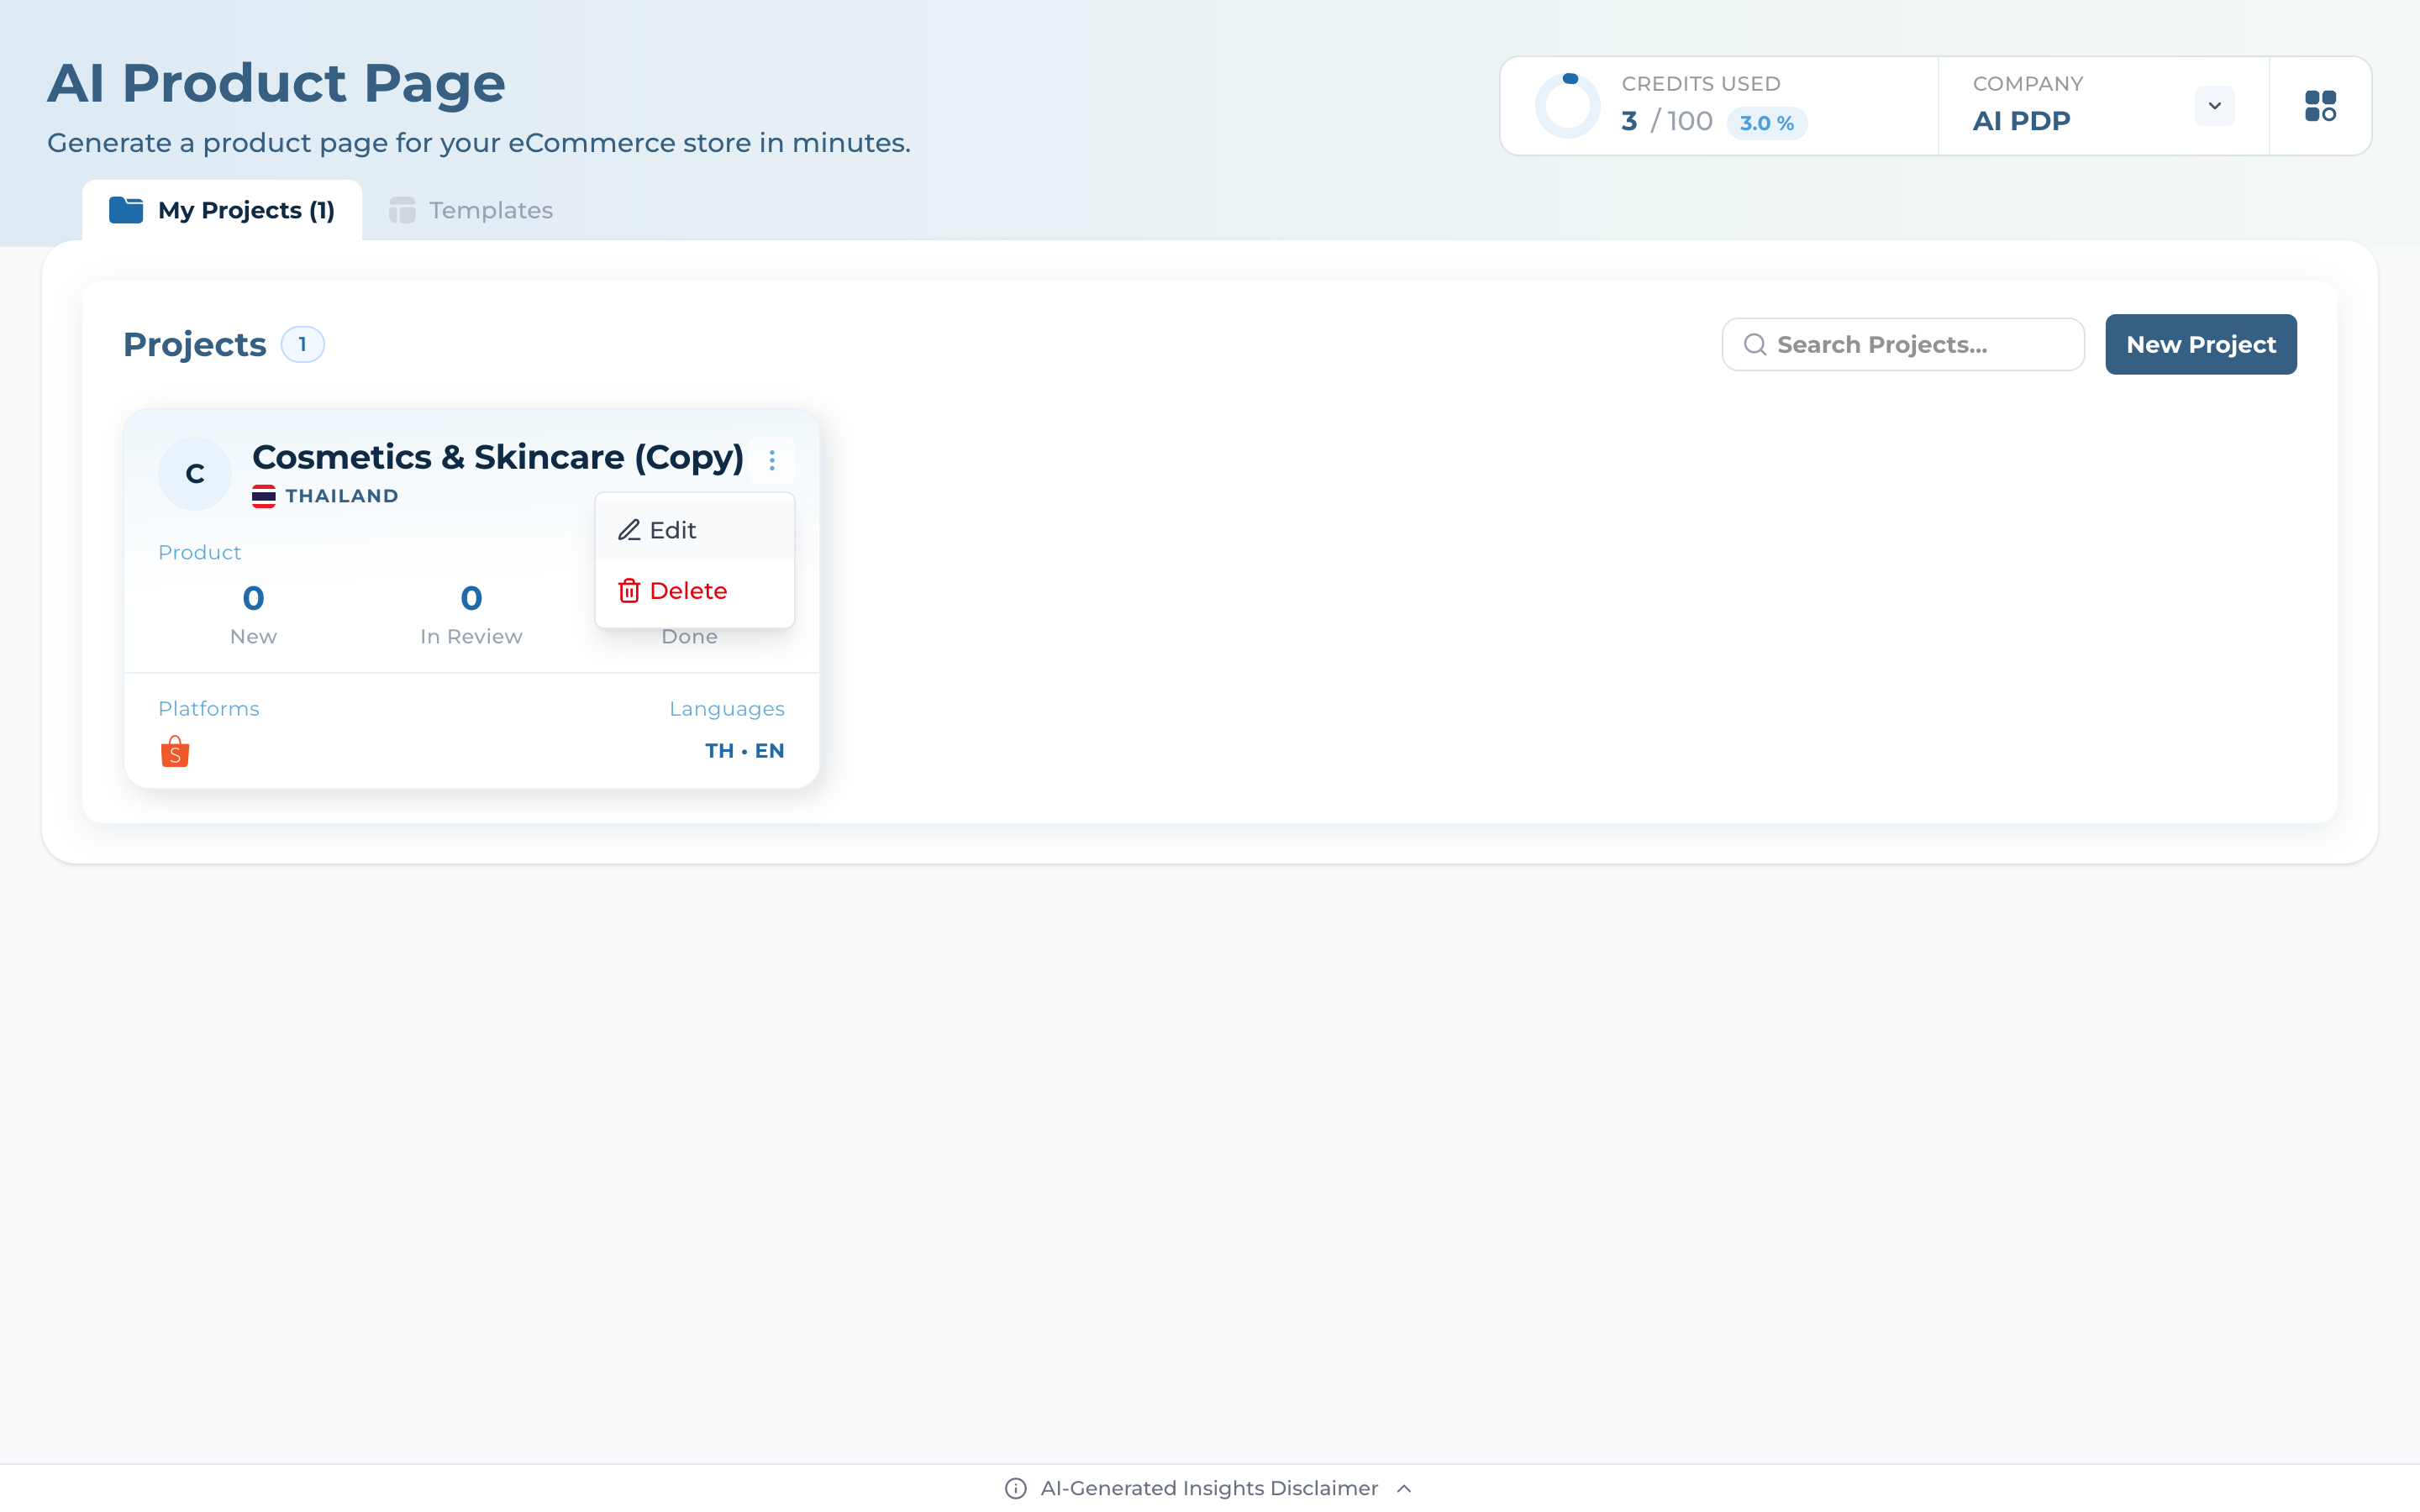
Edit or Delete a Project
Click the actions menu (three dots) on any project card to open Edit or Delete
Edit opens the project settings modal — change name, languages, platforms, description, instructions, and warranty policy
Delete removes the project and all its products — there's no undo, so use it only for finished or test projects